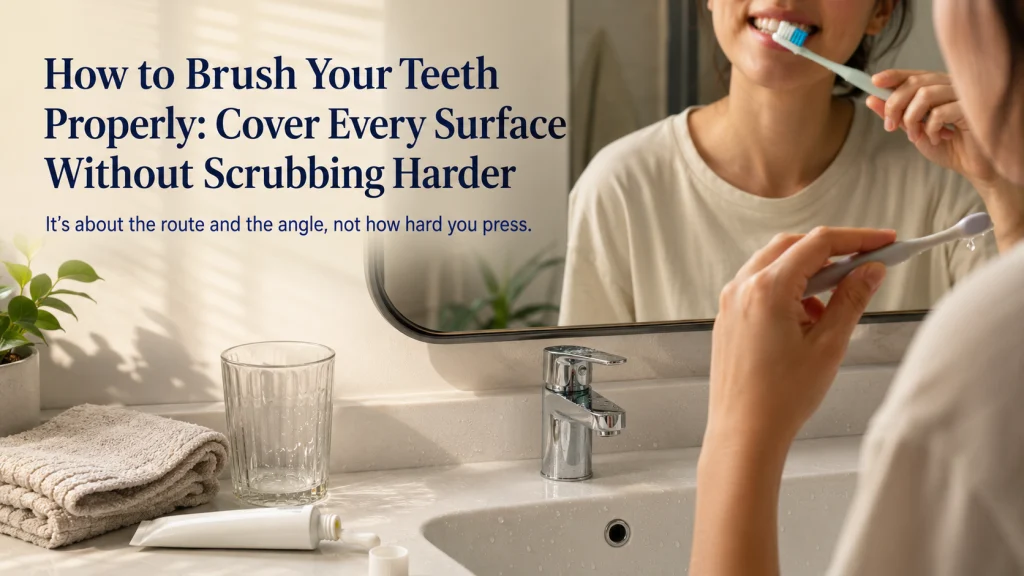
Proper tooth brushing depends more on complete surface coverage, gentle pressure, and a repeatable route than on using more force. Choose a soft-bristled brush that reaches comfortably, use fluoride toothpaste unless a dental professional gives different instructions, and spend about two minutes covering the outer, inner, and chewing surfaces twice a day. Manual and powered brushes require different hand motions, so follow the motion that matches the tool. Replace worn bristles, let the brush air-dry, and seek dental guidance when bleeding, pain, swelling, sores, loose teeth, or significant sensitivity persist.
A Two-Minute Session Can Still Miss Most of the Mouth
Picture a mouth map divided into four zones: upper right, upper left, lower right, and lower left. Each zone contains three surface types that need attention: the outside surfaces facing the cheeks or lips, the inside surfaces facing the tongue or roof of the mouth, and the chewing surfaces of the back teeth.
Now imagine the brush spending most of the session moving across the visible front teeth. The timer may reach two minutes, yet the inner surfaces, back molars, and gumline receive only a few rushed passes.
That is why an incomplete brushing session is often a coverage or pressure problem rather than a need for greater force. A reliable route makes missed surfaces easier to find and correct.
Move through all four zones and cover the outer, inner, and chewing surfaces before repeating areas that already received attention.
Define Plaque, Gumline, Tooth Surface, Pressure, and Powered Motion
Plaque is a soft film that forms on teeth. Brushing helps disrupt and remove it from accessible surfaces, while interdental cleaning is needed for spaces a brush may not reach well.
The gumline is the border where the tooth and gum meet. This area needs gentle attention without pressing the bristles forcefully into the tissue.
A tooth surface is one side of a tooth that the brush must reach. For routine coverage, think in three groups: outer, inner, and chewing surfaces.
Soft bristles are flexible enough to clean with light pressure. Pressure is the force applied through the handle. More pressure does not guarantee better coverage.
Powered motion is the movement created by an electric brush head. The hand usually guides and positions that head rather than recreating the repeated scrubbing motion used with some manual methods.
Choose a Brush Head and Handle That Reach Comfortably
The brush should fit behind the back teeth, along the inner surfaces, and around the curve of the front teeth without forcing the mouth open uncomfortably. A head that feels too large may encourage skipping tight areas, while a handle that is difficult to control can make pressure less predictable.
- Choose soft bristles for ordinary adult brushing unless a dental professional gives different instructions.
- Check whether the head reaches the back molars without scraping the cheeks.
- Use a handle that remains stable when the fingers are wet.
- Consider grip size and texture when hand strength or dexterity is limited.
- Make sure replacement heads or brushes are easy to obtain before the current bristles wear out.
Editorial observation: A brush can look compact on a shelf yet feel oversized inside the mouth. Head shape, handle balance, grip texture, timer visibility, charging access, and replacement-head availability often affect whether the same route can be repeated every day.
Use Fluoride Toothpaste Unless Your Dentist Gives Different Instructions
For ordinary adult brushing, use an appropriate fluoride toothpaste and follow its label. The toothpaste supports the routine, but it does not replace complete surface coverage or interdental cleaning.
Do not substitute a whitening, medicated, high-fluoride, desensitizing, or other treatment product without understanding its directions and purpose. Prescription or condition-specific toothpaste belongs under dental guidance.
The broader oral hygiene routine explains how brushing fits with interdental cleaning, mouthwash, optional steps, and prescribed products.
Divide the Mouth Into Four Zones and Three Surface Types
Use the same route each time so the brush does not follow only what is easiest to see. The direction can begin anywhere, but the sequence should be predictable enough that you know what comes next.
| Zone | Outer surfaces | Inner surfaces | Chewing surfaces | Coverage cue |
|---|---|---|---|---|
| Upper right | Cheek-facing teeth | Palate-facing teeth | Back-tooth grooves | Reach the last molar |
| Upper left | Cheek-facing teeth | Palate-facing teeth | Back-tooth grooves | Follow the same route as the first side |
| Lower left | Cheek-facing teeth | Tongue-facing teeth | Back-tooth grooves | Keep the tongue relaxed and out of the path |
| Lower right | Cheek-facing teeth | Tongue-facing teeth | Back-tooth grooves | Finish at the last molar rather than the visible front |
A simple route is outer surfaces around the mouth, inner surfaces around the mouth, then chewing surfaces. Another workable route is completing all three surface types in one zone before moving to the next. Consistency matters more than copying one universal route.
Place a Manual Brush Gently Near the Gumline
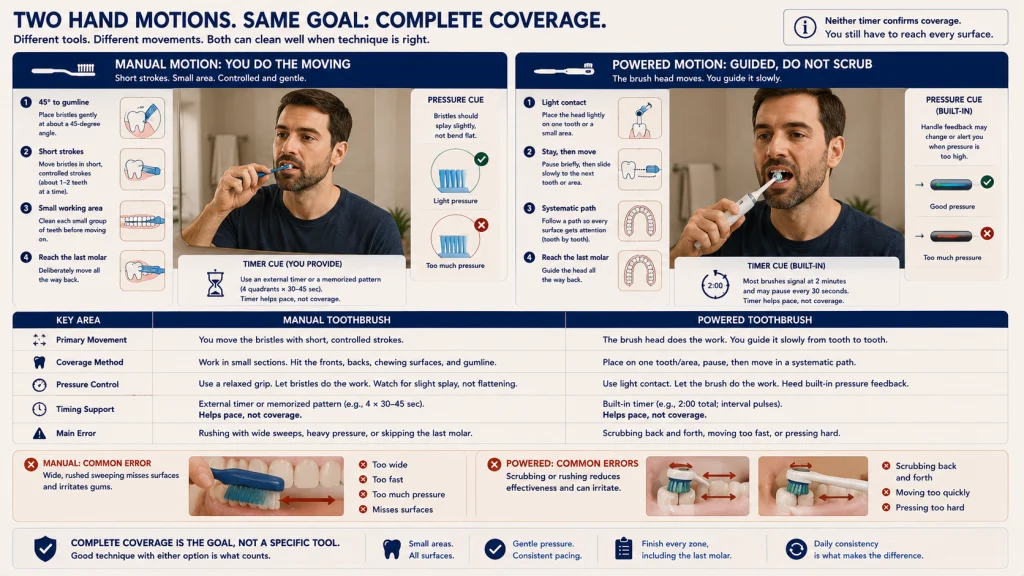
Position the bristles at about a 45-degree angle toward the gumline. Use short, controlled strokes that move across a small group of teeth at a time. Keep the pressure light enough that the bristles contact the surface without flattening sharply.
Move slowly enough to notice when the brush reaches the last tooth in each zone. Fast, wide strokes can cross the visible fronts repeatedly while skipping the inner surfaces and back corners.
- Short controlled strokes
- Small working area
- Gentle gumline contact
- Repeatable route
- Wide sweeping strokes
- Repeated attention to visible teeth
- Flattened bristles from excess force
- Skipped back molars
Tilt the Brush Vertically for the Inside of Front Teeth
The inside surfaces of the upper and lower front teeth can be difficult to reach with the brush held horizontally. Turn the brush so the head is more vertical, then use the front portion of the bristles with short, gentle movements.
Do not press the handle against the lips or gums to force the head into position. Adjust the angle, open the mouth slightly, and work one small area at a time.
Guide a Powered Brush Tooth by Tooth
A powered brush creates its own movement, so the hand usually guides the head along each surface and pauses briefly rather than adding strong back-and-forth motion. Follow the exact device instructions because head shape and movement pattern vary.
| Technique feature | Manual brush | Powered brush |
|---|---|---|
| Primary movement | Short controlled hand strokes | Device-created motion with guided positioning |
| Coverage method | Move across a small group of teeth | Guide the head along one tooth or small area at a time |
| Pressure control | Watch bristle bending and grip force | Use light contact and any built-in pressure feedback as directed |
| Timing support | External timer or memorized zone pattern | Built-in timer may help, but coverage still needs attention |
| Main error | Large rushed strokes | Adding unnecessary hand scrubbing or moving too quickly |
The comparison of electric and manual toothbrushes addresses device fit, cost, charging, replacement heads, and ease of use. Either type still depends on complete coverage and appropriate pressure.

Oral-B Pro 1000 is a rechargeable electric toothbrush built around a compact round brush head and oscillating cleaning motion. It includes pressure feedback to reduce excessive brushing force and a built-in quadrant timer that helps divide brushing time across the mouth. The straightforward handle and soft brush head make it a practical powered option for a structured tooth-by-tooth brushing routine.
Check On AmazonIf you click this link and buy, we earn a commission at no additional cost to you.
Use a Timer or Zone Pattern to Reach About Two Minutes
Brush twice daily for about two minutes unless a dental professional gives different instructions. A timer can prevent an unintentionally short session, but it cannot confirm that every surface was reached.
Divide the time across four zones or use a memorized route. If one zone always takes longer because access is difficult, spend the needed attention there without repeatedly passing over easy front surfaces.
Do not extend the session simply because coverage felt uncertain. Use a missed-surface audit to identify the exact area that needs a better angle or route.
Avoid Hard Bristles, Aggressive Pressure, and Repeated Passes
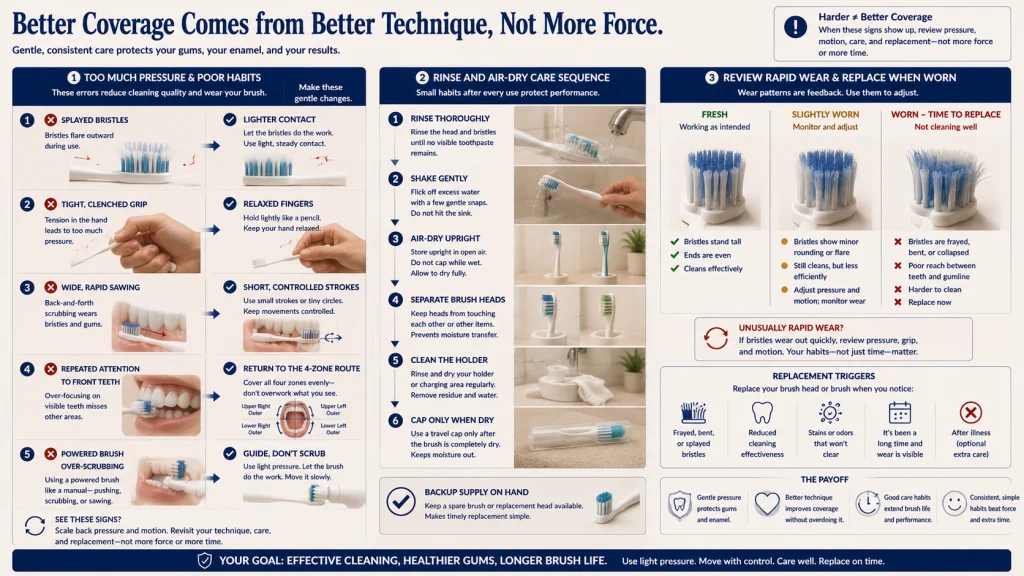
Force can make the brush feel active while reducing control. Flattened bristles, a tight grip, rapid sawing motion, or repeated passes over one easy area are pressure and route problems, not signs of better cleaning.
- Bristles splay during brushing: Lighten the grip and contact.
- Brush wears quickly: Review pressure, motion, and storage rather than accepting rapid wear as normal.
- Gums or teeth hurt during brushing: Stop forcing the area and seek guidance when pain persists.
- Front teeth receive repeated passes: Return to the four-zone route instead of adding more time.
- Powered brush feels difficult to control: Reduce hand motion and follow the device directions.
A soft brush used with poor pressure can still irritate tissue. Bristle type, grip force, route, and motion all need to work together.
Spit and Follow the Toothpaste or Dental Instructions for Rinsing
After brushing, spit out the excess toothpaste. Follow the exact label and any dental instruction for rinsing, eating, drinking, or using another product afterward.
Do not apply one universal rinse rule to every toothpaste, medicated product, mouthwash, or prescribed routine. Product interactions and timing can differ.
Rinse the Brush, Store It Upright, and Let It Air-Dry
After use, rinse away visible toothpaste and debris. Store the brush upright where air can circulate, and keep household brushes separated so the heads do not touch.
- Rinse the bristles and head after each use.
- Shake off excess water without striking the head against the sink.
- Store upright in open air when possible.
- Keep brush heads from touching one another.
- Clean the holder or charging area before residue builds up.
- Use a travel cap only when needed, and let the brush dry before enclosed storage.
- Keep replacement brushes or heads visible enough to notice when supplies are low.
Editorial observation: Storage can quietly change the routine. A wet travel cap, crowded cup, hidden charger, or empty replacement-head box creates friction long after the brushing technique itself has been learned.
Replace the Brush or Head When It Is Worn
Replace a toothbrush or powered head about every three to four months, or sooner when the bristles become frayed, bent, or visibly worn. Follow the current package and device directions when they differ.
Do not wait for every bristle to collapse. Worn bristles can make access and pressure control less predictable. If a brush wears much faster than expected, review grip force and motion.
Audit Missed Surfaces for One Week
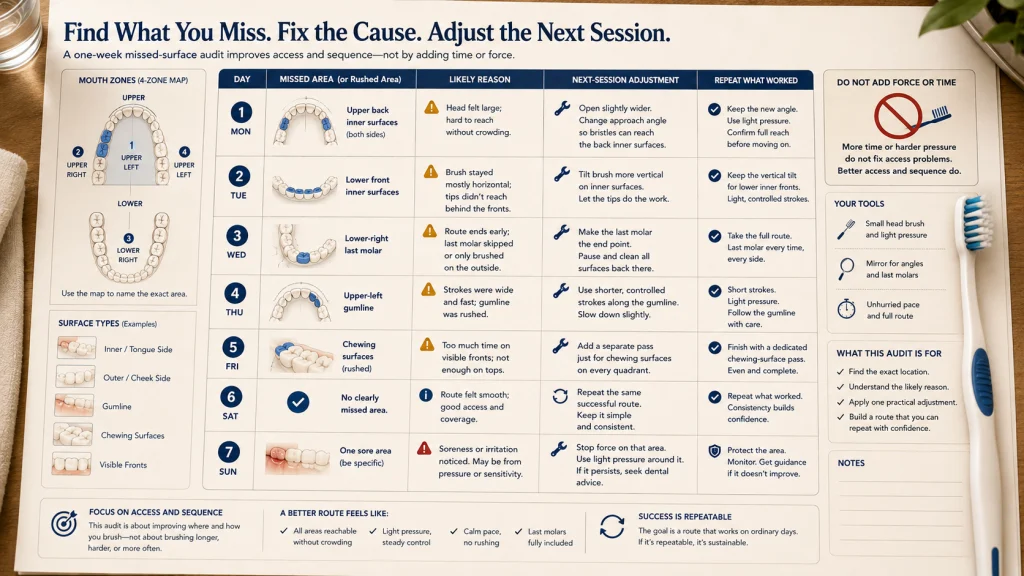
Use a simple coverage sheet rather than adding more brushing time. After each session, mark the area that felt rushed, difficult to reach, or uncertain.
| Day | Surface missed or rushed | Likely reason | Next-session adjustment |
|---|---|---|---|
| 1 | Upper back inner surfaces | Brush head felt large | Open slightly wider and change angle |
| 2 | Lower front inner surfaces | Brush stayed horizontal | Tilt vertically |
| 3 | Lower right last molar | Route ended too early | Use the last molar as the zone endpoint |
| 4 | Upper left gumline | Strokes were wide and fast | Use shorter controlled strokes |
| 5 | Chewing surfaces | Too much time on visible fronts | Reserve a separate chewing-surface pass |
| 6 | No clear missed area | Route felt repeatable | Repeat the same sequence |
| 7 | One sore area | Pressure or another concern | Stop forcing the area and seek guidance if it persists |
The audit should improve access and sequence, not reward longer or harder brushing. If the same area remains difficult after angle and route changes, ask a dental professional for individualized guidance.
Keep Braces and Clinical Instructions in Their Own Workflows
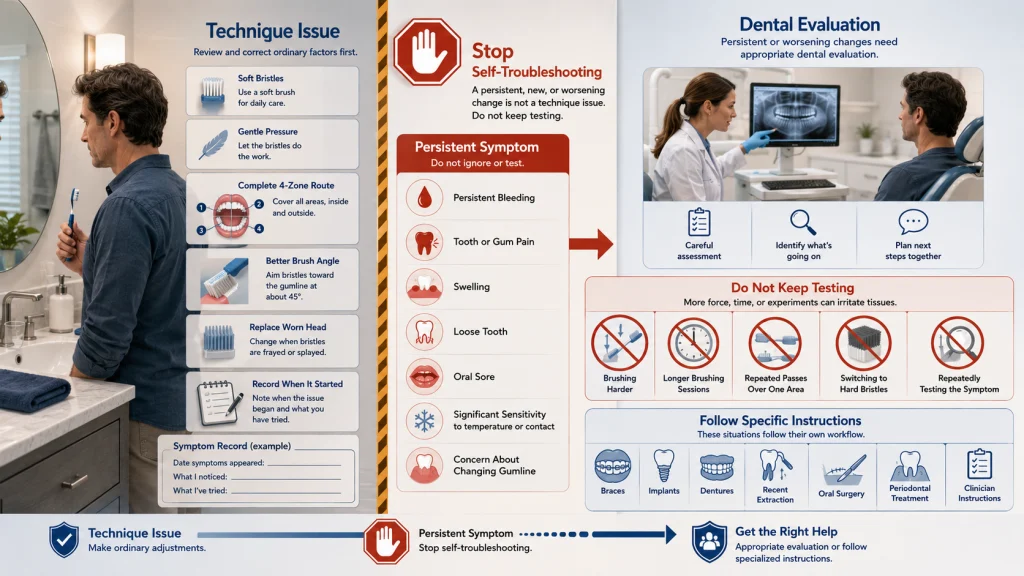
This guide covers ordinary adult brushing for natural teeth. Brackets, wires, implants, dentures, recent extractions, mouth sores, periodontal treatment, surgery, and radiation-related care can require different tools, timing, angles, or restrictions.
Use oral hygiene with braces for appliance-specific access around brackets and wires. Follow post-surgical, extraction, implant, periodontal, orthodontic, and clinician-specific instructions instead of applying this general route.
Stop and Seek Guidance for Persistent Symptoms
Persistent bleeding, pain, swelling, loose teeth, sores, significant sensitivity, recession concerns, or another new or worsening change requires dental evaluation. Do not keep increasing pressure or brushing time to test whether the symptom will disappear.
This article does not diagnose gum disease, cavities, recession, enamel wear, sensitivity, infection, or the cause of bleeding. A dental professional can assess whether the issue comes from technique, a product, an appliance, or another condition.
Use a Brush That Fits, a Complete Route, and a Clear Replacement Trigger
Choose a soft-bristled brush that reaches comfortably, use fluoride toothpaste unless instructed otherwise, and cover the outer, inner, and chewing surfaces in all four zones. Match the hand motion to a manual or powered brush, keep pressure gentle, and use a timer without letting it replace the coverage route.
Rinse and air-dry the brush, store it separately, and replace it about every three to four months or sooner when worn. Audit missed surfaces for a week when the route feels uncertain, and seek dental guidance for persistent symptoms or special treatment instructions.
For the broader care system, return to oral hygiene and personal hygiene for adults.
FAQs
🪥 How long should adults brush their teeth?
Brush twice daily for about two minutes unless a dental professional gives different instructions. Use the time to cover all four zones and all three surface types.
🧭 What surfaces should I brush?
Cover the outer surfaces, inner surfaces, and chewing surfaces. Pay special attention to the gumline, back molars, and the inside of the front teeth.
📐 Why use a 45-degree angle near the gumline?
The angle helps soft bristles contact the border where the tooth and gum meet. Use gentle pressure and short controlled strokes rather than forcing the bristles into the tissue.
⚡ Should I scrub with a powered toothbrush?
Usually, the device creates the movement. Guide the head along each surface and follow the exact instructions for that brush rather than adding forceful hand motion.
🫧 Should I rinse immediately after brushing?
Spit out excess toothpaste and follow the exact toothpaste label or dental instruction. Do not apply one rinsing rule to every product or prescribed routine.
🗓️ How often should I replace a toothbrush?
Replace the brush or powered head about every three to four months, or sooner when the bristles become frayed, bent, or visibly worn.
🩸 Is bleeding during brushing something to ignore?
No. Persistent bleeding requires dental evaluation. Do not respond by increasing pressure or repeatedly brushing the same area.
🦷 Does brushing replace cleaning between teeth?
No. A toothbrush may not reach spaces between teeth effectively. Interdental cleaning remains a separate part of an oral-care routine.