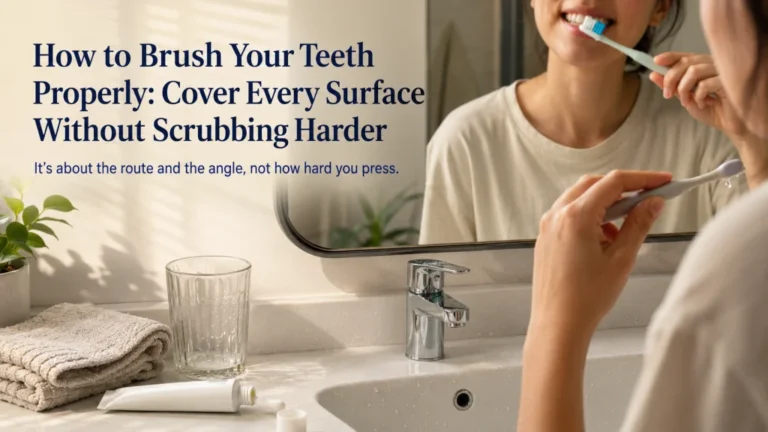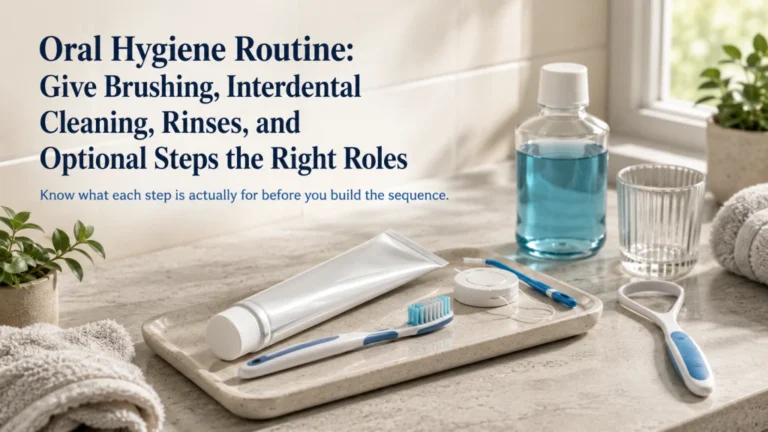
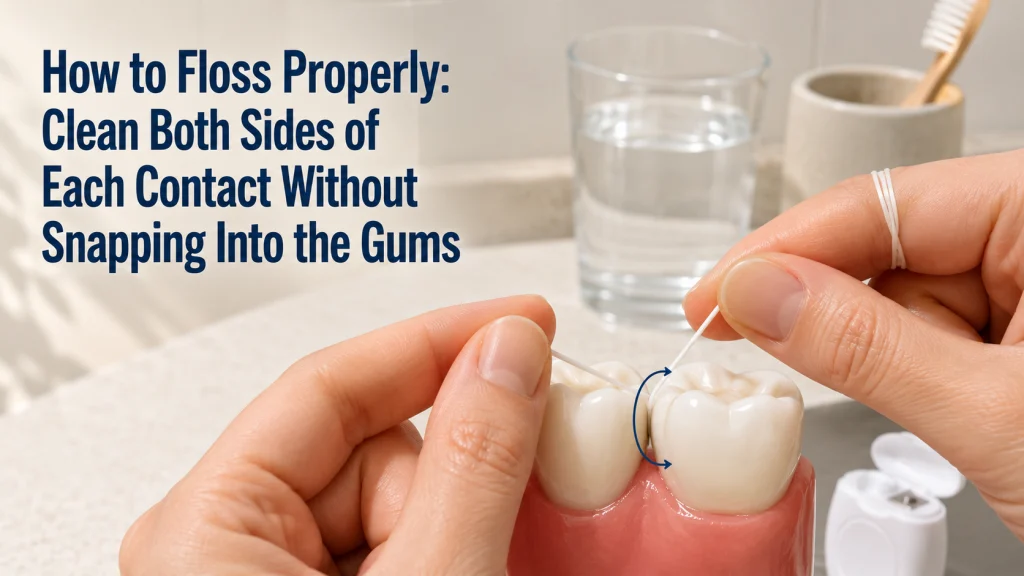
Proper flossing means more than passing floss through the contact between two teeth. The floss must wrap gently around the first tooth, clean that wall with controlled strokes, then shift to the second tooth wall in the same gap. Choose string, tape, or a holder that can reach every contact, use a fresh segment as the routine progresses, and floss once daily at a time you can repeat. Stop forcing the tool and seek dental guidance when floss repeatedly catches at one site or when bleeding, pain, swelling, pus, loose teeth, or suspected broken dental work persists.
One Gap Contains Two Tooth Walls
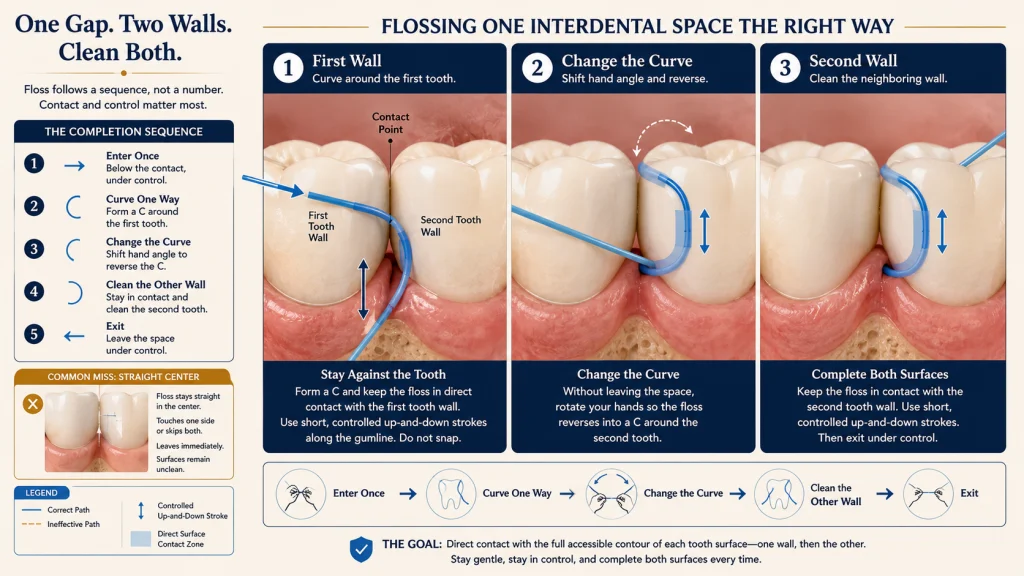
Floss can slip between two teeth and still leave most of the useful work undone. Picture an enlarged gap: the strand passes the contact, touches one side briefly, and comes back out. The motion feels complete, but one of the neighboring tooth surfaces was barely reached.
A better sequence slows down once the floss enters the space. Curve it around one tooth, clean that surface with controlled strokes, then change the angle so the strand follows the neighboring tooth before leaving the gap.
| Contact step | First tooth wall | Second tooth wall | What completes the gap |
|---|---|---|---|
| Pass through gently | Wrap and clean | Reposition, wrap, and clean | Both surfaces receive controlled contact |
The useful question is not only whether the floss got between the teeth. It is whether the strand actually followed the contour of each accessible surface.
Define the Contact, Interdental Surface, Gumline, C Shape, and Clean Segment
A tooth contact is the point where two neighboring teeth touch or nearly touch. The floss must pass this point without snapping into the tissue below.
An interdental surface is the side of a tooth facing its neighbor. The floss needs direct contact with that surface rather than remaining straight in the middle of the space.
The gumline is the border where the tooth and gum meet. Floss should follow the tooth surface gently near this border without being forced deeply below it.
A C shape forms when the floss curves around one tooth rather than remaining straight in the center of the gap. A clean segment is an unused portion of floss moved into position as the routine progresses.
A symptom boundary marks the point where technique advice should stop and dental evaluation should begin. Persistent bleeding, significant pain, swelling, pus, loose teeth, or repeated catching at one site should not be managed through repeated attempts.
Choose String, Tape, or a Holder That Reaches Every Contact
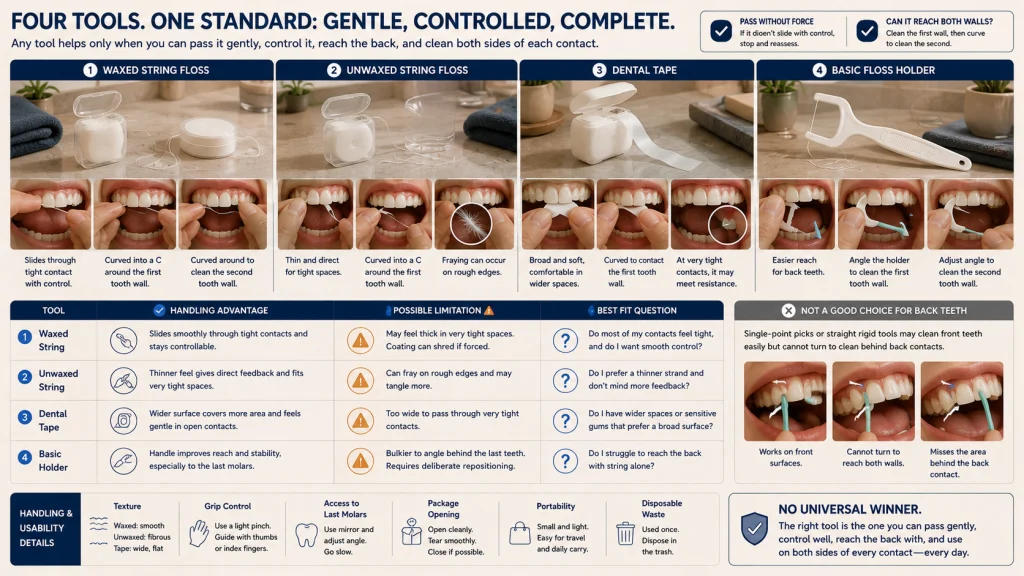
The best tool is the one that can pass the contacts gently, wrap the tooth surfaces, and reach the back of the mouth consistently. Texture, width, grip, and handle shape affect usability more than the label alone.
| Tool | Handling advantage | Possible limitation | Best fit question |
|---|---|---|---|
| Waxed string floss | May slide through tight contacts more smoothly | Can still shred around rough edges | Can you control the curve around both tooth walls? |
| Unwaxed string floss | May feel thin and direct in some contacts | May fray or feel harder to guide | Does the texture remain comfortable and controllable? |
| Dental tape | Wider surface may feel comfortable in broader spaces | May be difficult in very tight contacts | Does the width pass without force? |
| Basic floss holder | Can improve reach and reduce finger wrapping | May offer less freedom to reposition the floss around each wall | Can the holder angle reach the back contacts and both surfaces? |
Editorial observation: Floss texture, tape width, holder grip, package opening, portability, waste, and reach all affect whether the technique can be repeated. A tool that works well for the front teeth but cannot turn around the back contacts is not solving the full handling problem.
Use Enough Floss to Control a Fresh Segment
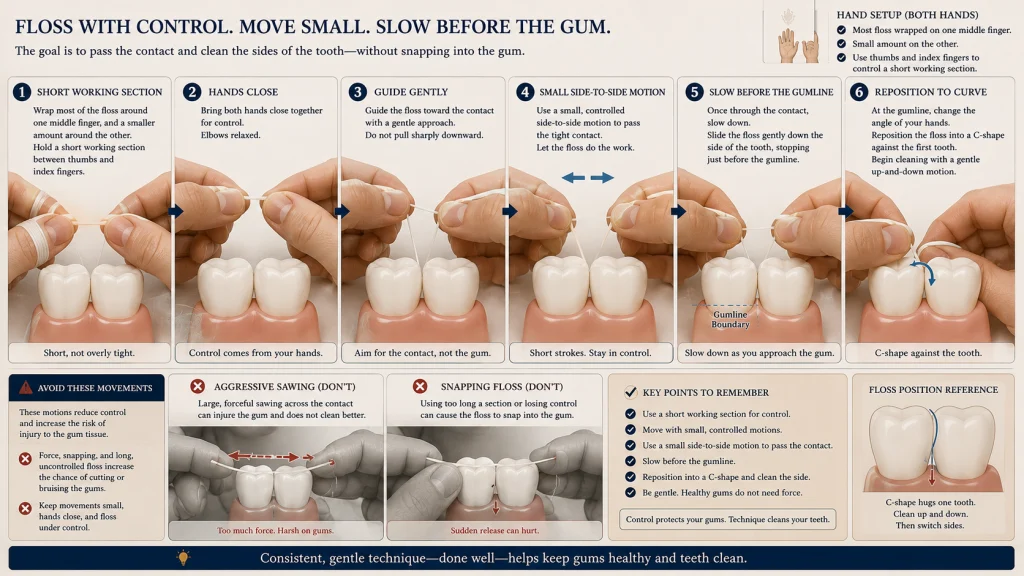
Use a length that allows secure finger control and enough unused material to advance through the mouth. Wrap most of the floss around one middle finger and a smaller amount around the other, leaving a short working section between the hands.
Guide the working section with the thumbs and index fingers. Keep it short enough to control but not so tight that the hands pull abruptly against the gums.
As one area is completed, wind used floss onto one finger and release clean floss from the other. The goal is not a perfect measurement. It is stable handling plus enough fresh material for the full routine.
Guide the Floss Through the Contact Without Snapping
Hold the floss firmly and move it gently through the contact with a small side-to-side motion. Control the descent so the floss does not release suddenly into the gum tissue.
Do not saw aggressively across the contact. The side-to-side movement is only for passing the tight point between the teeth. Once below the contact, the floss should curve around a tooth rather than remain stretched straight across the center.
- Hold a short working section between the thumbs and index fingers.
- Keep both hands close enough for control.
- Guide the floss toward the contact without pulling downward sharply.
- Use a small side-to-side movement to pass the contact.
- Slow the floss before it reaches the gumline.
- Reposition the hands to form a curve around the first tooth.
Wrap the Floss Around the First Tooth
Once the floss is below the contact, draw it against the side of one tooth until the strand follows the tooth’s curve.
Move with controlled up-and-down strokes while maintaining contact with the tooth. Near the gumline, keep the motion gentle and avoid pushing the strand deeper than it naturally follows.
Coverage matters more than counting strokes. The strand should stay against the tooth instead of drifting into the center of the gap.
Move to the Second Tooth Wall in the Same Gap
Before pulling the floss out, shift hand position so the curve changes direction and rests against the neighboring tooth.
Clean that surface with the same steady motion. This second pass is easy to skip because the contact has already been crossed and the hands are ready to move on.
Contact-completion rule: Enter once, change the curve once, and make sure the strand follows both neighboring surfaces before moving to the next space.
Advance to a Fresh Segment as the Routine Progresses
Advance to unused material as the strand becomes coated, frayed, stretched, or harder to control. A fresh section gives the fingers a cleaner, more predictable working area.
The timing does not need to follow an exact count. Move forward whenever the current section no longer handles smoothly.
Do not place used disposable floss back into the package or save it for another day.
Reach the Back Surface of the Last Teeth
The last molar on each side has a rear surface even though there is no neighboring tooth behind it. Guide the floss behind that tooth, curve it around the back wall, and clean the accessible surface gently.
Use shorter finger movements and turn the head slightly if that improves access. A holder may help when hand reach is limited, but the floss still needs to contact the tooth surface rather than only enter the space.
Choose a Consistent Daily Time and a Workable Brush-Floss Order
Clean between the teeth once daily at a time you can repeat. Morning or evening can work, and flossing before or after brushing can fit an ordinary routine when both steps are completed thoroughly.
The broader oral hygiene routine explains how to place brushing, interdental cleaning, rinses, and optional steps into the day without turning the sequence into a rigid universal rule.
Consistency matters more than waiting for a perfect time. Choose the point in the day when the tool, mirror, lighting, and hand control are easiest to manage.
Troubleshoot Tight Contacts, Shredding, Poor Grip, and Back-Tooth Access
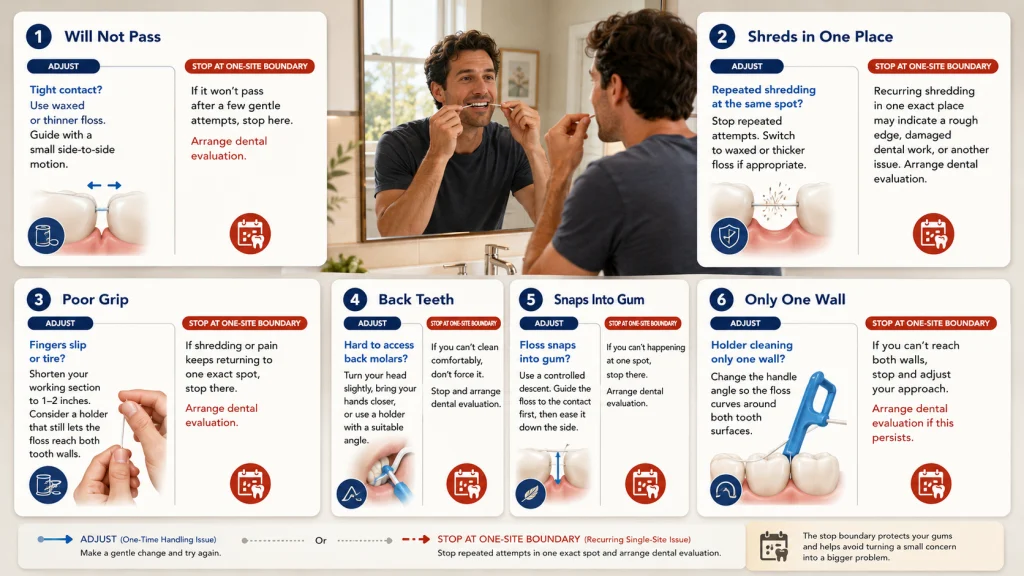
- Floss will not pass: Try a thinner or waxed option and use a controlled side-to-side motion. Do not push harder.
- Floss shreds between the same teeth: Stop repeated attempts and seek dental evaluation when the problem continues at one site.
- Fingers lose grip: Shorten the working section or consider a holder that still allows access to both tooth walls.
- Back teeth are hard to reach: Turn the head, bring the hands closer, or use a holder with a suitable angle.
- Floss snaps into the gums: Slow the insertion and control the floss before it passes the contact.
- The holder cleans only one wall: Change the angle and confirm that the floss can curve around both surfaces.
When the same contact remains difficult after a gentler angle or different tool, treat that as information rather than a challenge to overcome with more pressure.
Use a Different Method for Appliances, Wider Spaces, or Handling Limits
String floss is one option, not a universal requirement. Wider spaces, limited hand reach, dental appliances, or specific dental work may call for a water flosser, interdental brush, holder, threader, or another professionally selected tool.
Use water flosser versus floss when the question is which interdental method fits the mouth and handling needs. Use oral hygiene with braces for threaders, brackets, wires, and appliance-specific access.
Bridges, implants, periodontal pockets, recent procedures, and other clinical situations may need a method selected by a dental professional. This article stays with ordinary contact cleaning and does not teach deep subgingival or disease-specific care.
Do Not Reuse Disposable Floss
Discard used string floss after the routine. It may be frayed, stretched, coated, or less controllable after passing multiple contacts.
For a disposable holder, follow the package directions and discard it after use when the product is designed for one session. Do not wash and store a single-use tool as though it were a reusable dental device.

REACH Waxed Dental Floss is a smooth waxed string floss designed for controlled cleaning between neighboring teeth. Its shred-resistant construction helps the strand move through contacts while maintaining enough structure for wrapping against the sides of the teeth. The compact 55-yard dispenser provides a simple traditional floss option for a regular interdental-care routine.
Check On AmazonIf you click this link and buy, we earn a commission at no additional cost to you.
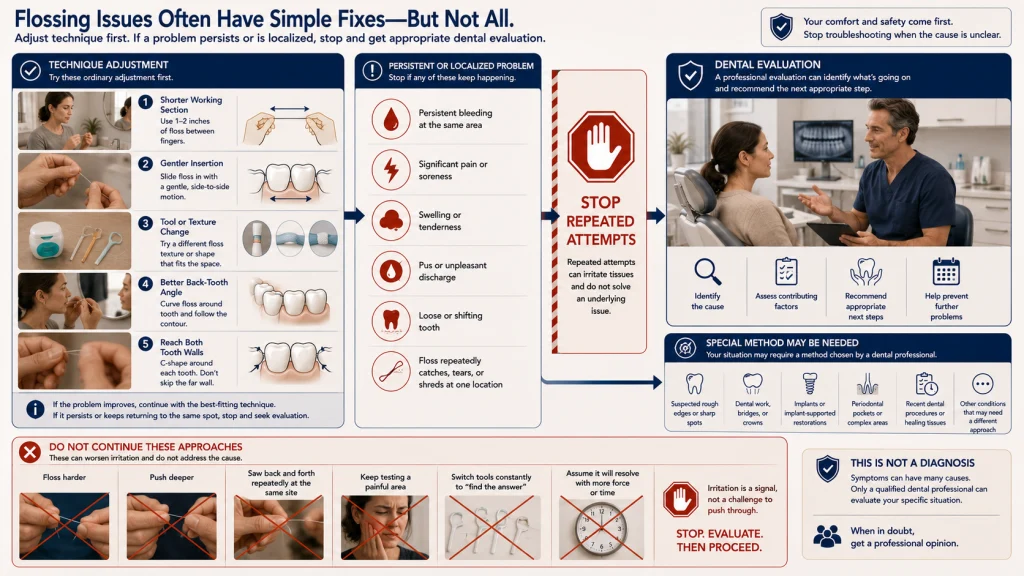
Stop for Persistent Bleeding, Pain, Swelling, or Repeated Catching
Seek dental evaluation for persistent bleeding, significant pain, swelling, pus, loose teeth, or floss that repeatedly catches, tears, or shreds at one location. A recurring problem at one site may involve a rough edge, damaged dental work, or another issue that needs assessment.
This article does not diagnose gingivitis, periodontitis, cavities, broken restorations, gum recession, or the cause of bleeding. Do not keep probing a painful or repeatedly snagging area while waiting for the problem to resolve.
Use the Right Tool, Clean Both Walls, and Know When to Stop
A workable routine begins with a tool you can control and a sequence you can remember. Ease through the contact, follow one tooth surface, change the curve, and finish the neighboring surface before moving on.
Use fresh material as handling changes, include the backs of the last teeth, and choose a daily time that fits your hands and schedule. When one location repeatedly snags, hurts, swells, or bleeds, stop troubleshooting it at home and arrange dental guidance.
For the broader care system, return to oral hygiene and personal hygiene for adults.
FAQs
🦷 What does proper flossing actually clean?
It cleans the accessible side surfaces where neighboring teeth face each other. The strand needs to follow the tooth contour rather than simply pass through the contact.
🧵 How much floss should I use?
Use enough to wrap securely around the fingers and advance to fresh sections throughout the mouth. The exact length matters less than control and clean material.
🤲 How do I stop floss from snapping into my gums?
Keep the working section short, use a small side-to-side motion through the contact, and slow the floss before it reaches the gumline.
🔄 Should I clean both sides in the same gap?
Yes. After finishing one surface, change the hand angle so the floss rests against the neighboring tooth before you withdraw it.
📅 How often should adults floss?
Clean between the teeth once daily unless a dental professional gives different instructions.
🪥 Should I floss before or after brushing?
Either order can work in an ordinary routine when both steps are completed thoroughly and consistently.
🩸 Is bleeding something I should ignore?
No. Persistent bleeding requires dental evaluation. Do not increase force or push the floss deeper to test the area.
⚠️ What if floss tears in the same place every time?
Stop repeated attempts and seek dental evaluation. A rough surface, broken dental work, or another local problem may need assessment.