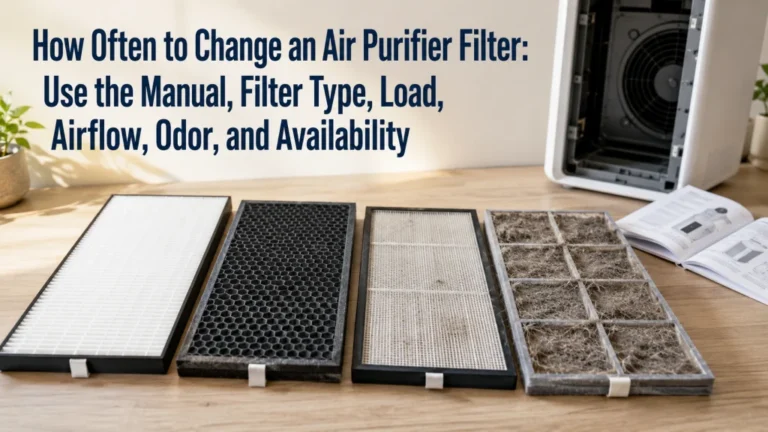
The right MERV rating starts with the exact HVAC system, filter slot, and physical filter size, not with the largest number on a package. MERV 13 can be an appropriate target when the system fan and filter location can support it, while some systems require a different compatible choice. A filter must fit snugly, face the correct direction, and remain within the equipment instructions or air may bypass it and system behavior may change. Choose efficiency only after confirming size and compatibility, then monitor the installed filter and equipment instead of relying on one universal replacement calendar.
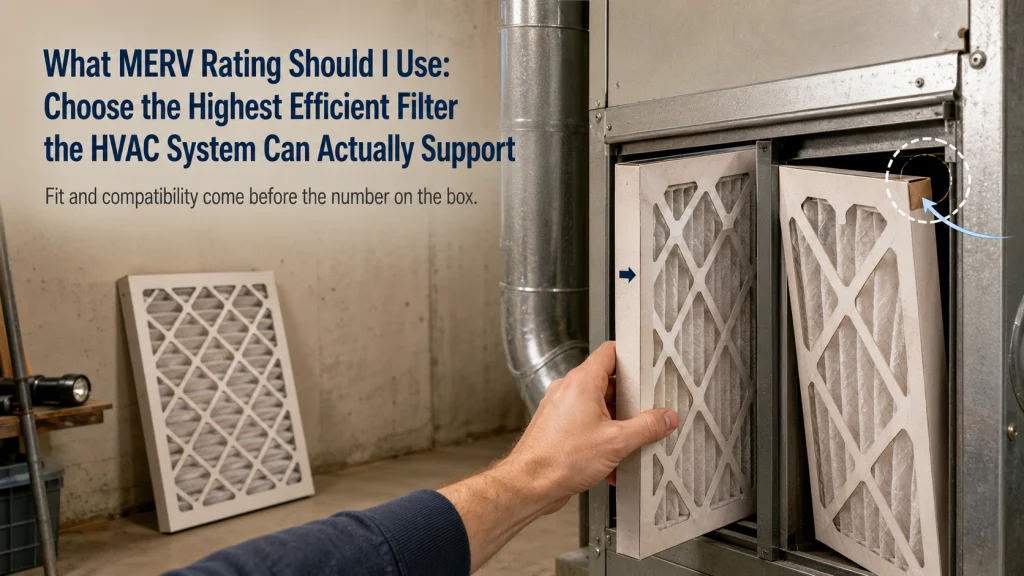
Two Filters Can Share the Same Label and Fit Completely Differently
Two boxes both say 20 by 20 by 1 and MERV 13. The first filter slides into the rack, sits square against the stops, and leaves no obvious gap around the frame. The second reaches the slot at a slight angle, catches on the edge, and must be bowed before the access panel will close.
The efficiency number did not change, but the installation did. A crushed frame can distort the media. A loose frame can leave a path around it. In either case, the label cannot compensate for a poor physical match.
Nominal-versus-actual-size opening:
Package label
Nominal size: 20 × 20 × 1
Efficiency label: MERV 13
Filter A
Actual dimensions match the rack → frame stays square → airflow is directed through the media
Filter B
Actual dimensions differ → frame bends or leaves a gap → part of the airflow may bypass the intended filter path
Decision
Confirm exact dimensions and approved filter type before comparing efficiency levels.
The first question is not “Which MERV number is best?” It is “Which filter can this exact system hold, seal, and move air through as designed?”
Define MERV, Rating Scales, Filter Size, Bypass, and Pressure Drop
MERV stands for Minimum Efficiency Reporting Value. It classifies particle-filter performance under a standardized test method. The rating helps compare how filters perform across particle-size ranges, but it does not describe every feature of the complete HVAC system.
Particle-size efficiency describes how effectively the tested media captures particles within defined size groups. A MERV number is not a promise about a medical outcome, room-cleaning speed, odor removal, or the condition of a particular home.
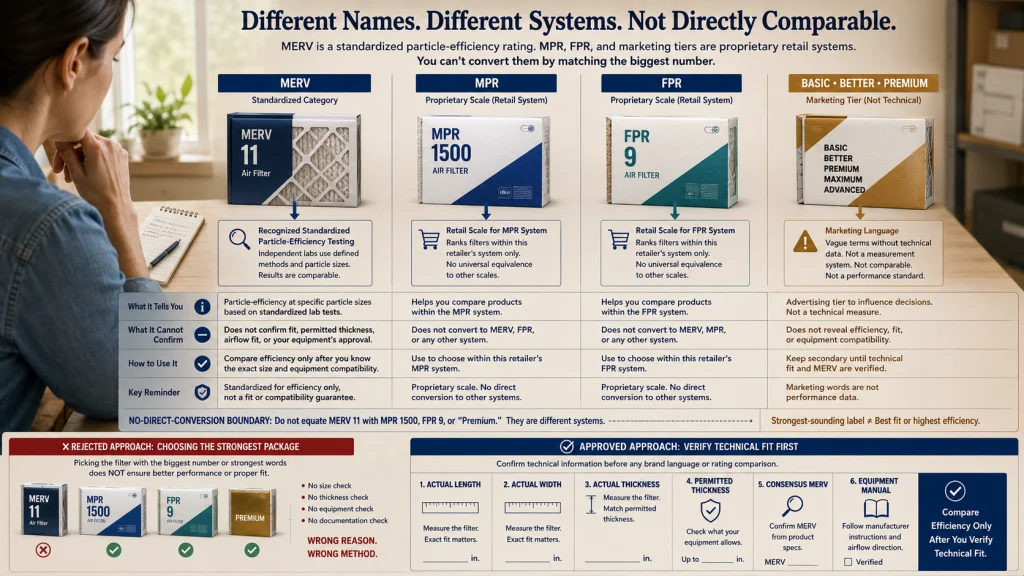
MPR and FPR are proprietary retail rating systems. They may sort products into their own tiers, but they are not interchangeable with MERV by simply matching the largest visible number.
Nominal size is the rounded size commonly printed on the package. Actual size is the filter’s measured length, width, and thickness. Two filters with the same nominal label can have different actual dimensions.
Thickness affects whether the filter fits the slot or media cabinet and may also be part of the system’s approved filtration design. A one-inch rack and a deeper media cabinet are not automatically interchangeable.
Bypass occurs when air travels around the filter rather than through the media. Pressure drop is the difference in air pressure across the filter under specific conditions. It can vary with the product, airflow, loading, installation, and system. A MERV label alone does not reveal whether the resulting resistance is acceptable for a particular blower.
Separate Consensus MERV From Proprietary Marketing Tiers
Shopping becomes confusing when packages place several large rating systems beside words such as basic, better, premium, or maximum. Those tiers can help organize one brand’s assortment, but they do not replace the system manual, exact dimensions, or a recognized MERV classification.
| Rating-system table | What it can tell you | What it cannot confirm | How to use it |
|---|---|---|---|
| MERV | Standardized particle-efficiency category under the applicable test method | Exact pressure drop in your installed system, fit, blower capacity, filter life, or health outcome | Use it as the main efficiency comparison after compatibility and dimensions are known |
| MPR | A proprietary way to distinguish filters within a retail system | A direct one-number equivalence with every MERV or FPR label | Look for the stated MERV information and exact product documentation |
| FPR | A proprietary retail tier for comparing products within that scale | Universal compatibility or a guaranteed match to another proprietary scale | Use it only as secondary shopping information, not the final system decision |
| Marketing tier | The position a product holds within a brand or store assortment | Standardized performance, system fit, airflow compatibility, or remaining service life | Ignore the tier until the technical specifications are verified |
Nora’s observation: Proprietary scales make side-by-side shopping harder because the boldest number may belong to a brand’s own system. I separate four things before comparing boxes: exact actual size, permitted thickness, consensus MERV, and the equipment instructions. Marketing tiers come after those checks, not before them.
A simple comparison sheet prevents a familiar store-aisle mistake: choosing the package that sounds strongest and only later discovering that the frame does not fit the rack.
Identify the Exact Equipment and Every Filter Location
A home may have a filter at a return grille, beside the furnace or air handler, inside a media cabinet, or at more than one approved location. The visible return in the hallway may not be the only place to inspect, and a previous owner may have left an unusual arrangement that should not be copied without verification.
Record:
- The equipment manufacturer and model information.
- The filter location or approved filter locations.
- The direction of airflow through the rack.
- The existing filter’s nominal and actual dimensions.
- The slot or cabinet’s usable depth.
- Any gasket, door, retaining clip, track, or stop that controls fit.
- Whether the system documentation allows one filter or multiple filters.
Do not add a second filter because another grille looks empty. Do not remove an equipment filter merely because a return filter is present. The correct arrangement belongs to the exact system design and documentation.
Homes with ductless mini-splits or window units need a different check. Their washable screens are often intended mainly to protect equipment from larger debris and are not selected through the same residential central-filter workflow.
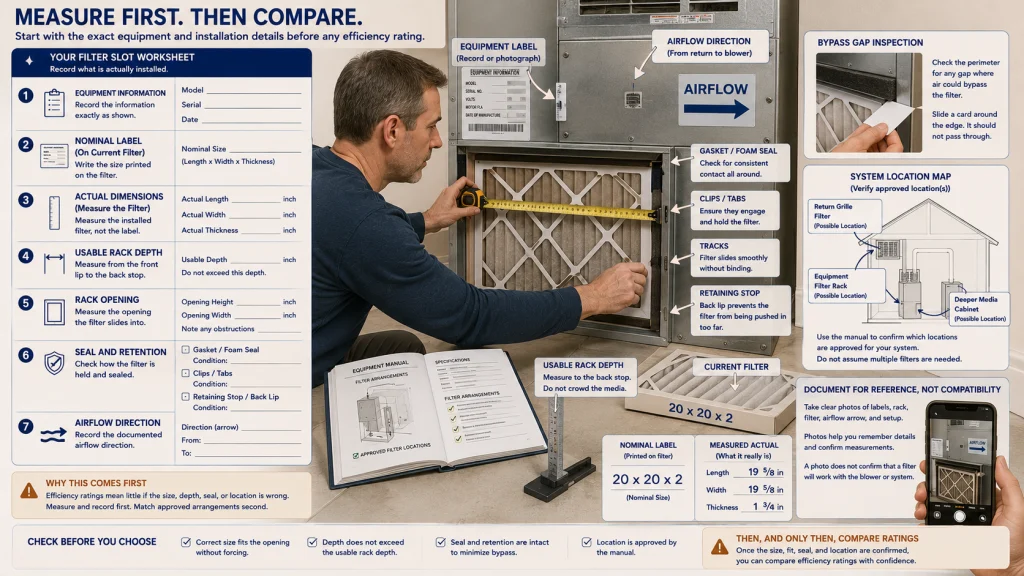
Read the Manual and Existing Filter Dimensions Before Choosing Efficiency
The system manual may specify an allowed filter type, size, thickness, location, installation direction, inspection routine, or service condition. Those details belong ahead of the MERV comparison because they define the physical and operating limits. This step can feel slower than comparing packages, but it prevents the frustrating trip home with a filter that will not enter the slot without bending.
When the manual is missing, use the equipment model to locate current documentation from the manufacturer. Confirm that it applies to the exact model and configuration rather than a similar-looking unit. A filter rack added during installation may also have its own approved dimensions.
| Filter-slot measurement sheet | What to record | Why it matters |
|---|---|---|
| Nominal label | The rounded size printed on the current filter | Useful for shopping, but not enough to prove fit |
| Actual length | Measured frame length | Confirms whether the frame reaches the rack stops correctly |
| Actual width | Measured frame width | Helps identify gaps, rubbing, or a forced diagonal installation |
| Actual thickness | Measured frame depth | Prevents forcing a thick filter into a shallow slot |
| Rack opening | Usable interior dimensions, track condition, and access clearance | Shows whether the installation can remain square and serviceable |
| Seal and retention | Gasket, clips, door fit, tracks, and visible bypass gaps | Keeps airflow on the intended path through the media |
| Airflow direction | Direction from return side toward blower or equipment | Determines how the filter arrow should face |
Measure the installed filter before discarding it, then compare that record with the approved specifications. A phone photo of the label and rack can preserve the small details that are easy to forget in a store aisle, but it does not establish blower compatibility.
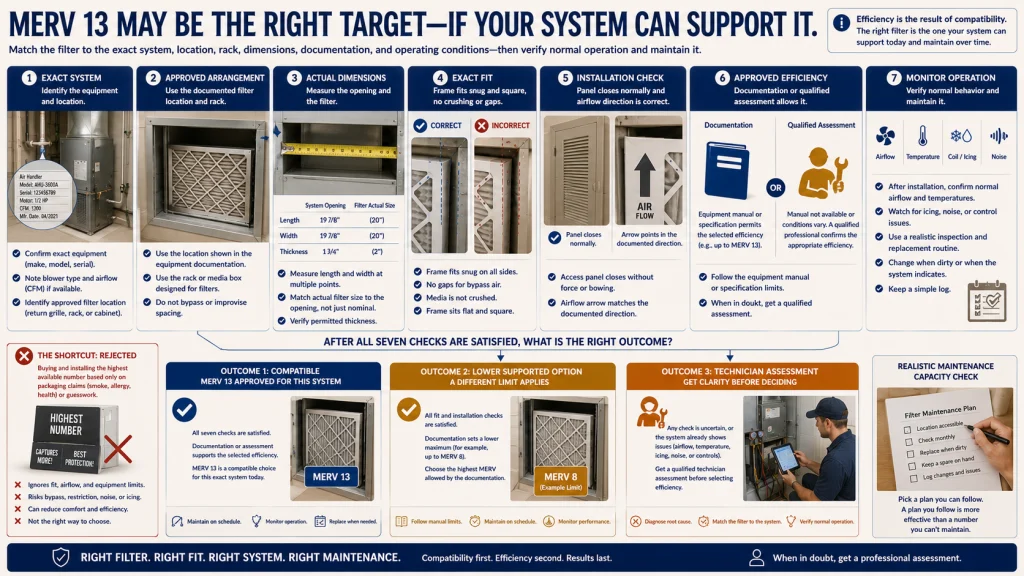
Treat MERV 13 as a Compatibility-Dependent Target, Not a Universal Rule
A common federal recommendation is to consider MERV 13, or the highest-efficiency filter the system fan and filter slot can accommodate, when appropriate. The second half of that statement is essential. It makes the equipment limit part of the recommendation rather than an inconvenience to work around.
Use this sequence:
- Confirm the exact equipment and approved filter arrangement.
- Verify nominal size, actual dimensions, thickness, and fit.
- Review the permitted filter specifications and maintenance instructions.
- Compare MERV options only within those physical and operating limits.
- Ask a qualified HVAC technician when the manual is unclear or the system shows airflow, temperature, icing, noise, or control concerns.
MERV capability checklist:
- The filter type and location are approved for the exact equipment.
- The actual length, width, and thickness fit without crushing or improvised spacing.
- The frame sits square and the access panel closes normally.
- The airflow arrow faces the correct direction.
- The chosen efficiency is allowed by current equipment documentation or qualified assessment.
- The system shows no new abnormal behavior after installation.
- The household can inspect and replace the filter through a realistic maintenance routine.
MERV 13 is not a medical prescription and should not be presented as safe for every home. In some systems it may be compatible and useful. In others, the highest supported option may be lower, or the system may need assessment before any efficiency change.
Understand What MERV Measures and What It Leaves Unanswered
MERV helps compare particle-capture performance across defined particle-size ranges. It can inform a central-filter choice for particles, including smaller airborne particles that may be relevant during smoke events, but it does not describe the full behavior of the installed HVAC system.
MERV does not independently tell you:
- Whether the filter fits the rack without gaps.
- How much air the installed system moves with that exact product.
- Whether the blower, coil, ducts, and controls are in suitable condition.
- How often the system fan runs.
- How quickly the filter loads in the home’s actual environment.
- Whether odors or gases are addressed.
- Whether one room receives enough return and supply airflow.
- Whether the filter prevents or treats any medical condition.
A high rating on a filter sitting in an idle system cannot provide continuous central filtration. A well-fitted compatible filter also cannot replace source control or clean outdoor-air ventilation when those actions are applicable and safe.
Compare MERV 8, 11, 13, and Higher as Test Categories
MERV categories describe tested particle-filter performance, not a ladder of household virtue. Moving upward generally indicates stronger performance across relevant particle-size groups, but the practical choice remains constrained by the exact filter product and HVAC system.
| MERV category | How to interpret it | Compatibility question | What not to conclude |
|---|---|---|---|
| MERV 8 | A common residential particle-filter category with lower tested efficiency than the categories below | Is it the approved baseline, and does it fit and seal correctly? | That it is automatically inadequate for every home |
| MERV 11 | An intermediate tested category with stronger particle efficiency than MERV 8 | Does the exact system permit this product, thickness, and resistance? | That its number can be compared directly with every proprietary retail number |
| MERV 13 | A higher tested category often considered when the system can support it | Can the fan, slot, rack, and current system condition accommodate the exact filter? | That every home should install it or that it guarantees a health result |
| Higher than MERV 13 | Higher test categories with increasing filtration demands and specialized applications in some cases | Is the equipment specifically designed and documented for the selected product? | That a more demanding category belongs in equipment not designed for it |
The table narrows the efficiency discussion, but it does not choose the filter. A category that looks reassuring on paper can still become the wrong household choice when the rack is shallow, the frame does not seal, or the system begins behaving differently after installation.
Check Length, Width, Thickness, Frame, Arrow, Rack, and Seal
Bring the measurement sheet to the filter, not just the nominal label. Inspect the frame before installation. A warped corner, weak edge, torn media, damaged seal, or incorrect thickness can interfere with fit even when the package size appears correct.
Install only when:
- The actual dimensions match the approved rack or cabinet.
- The frame enters square without being folded, shaved, or forced.
- The media remains intact and does not touch moving equipment.
- The airflow arrow points toward the blower or in the documented direction.
- The filter is retained securely and does not rattle or shift.
- The access door closes normally without compressing the frame.
- There is no obvious perimeter gap that creates an easier path around the media.
Nora’s observation: Thick media filters can look more substantial, but a deeper frame belongs in a cabinet designed for it. I also check whether replacement filters are consistently available in the exact actual size. A technically compatible setup becomes frustrating when every replacement requires a special order or the multipack cannot be stored without bending the frames.
Do not infer that a thicker filter is automatically more restrictive or automatically better. The answer depends on the exact media design, surface area, product data, and system.
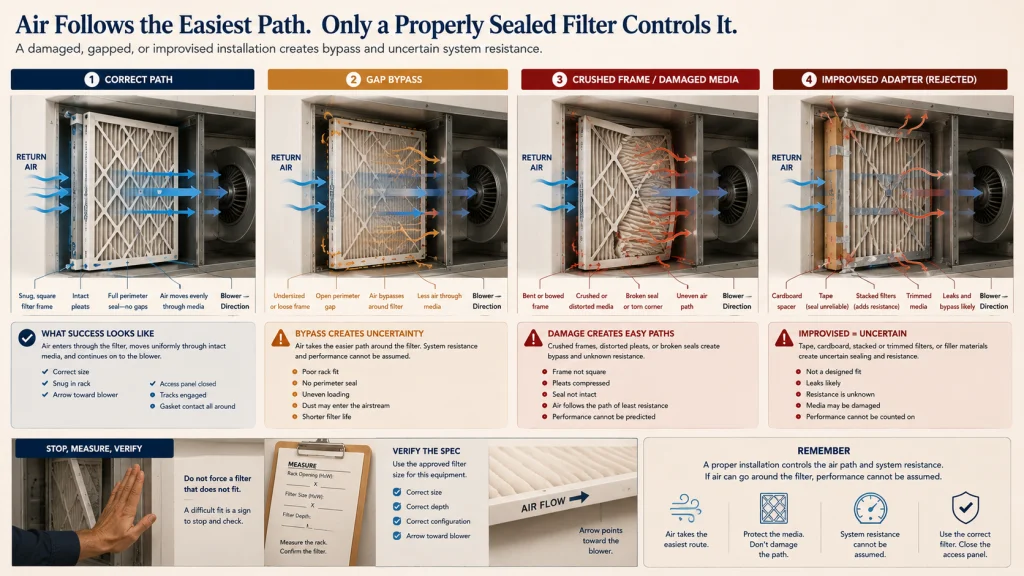
Do Not Crush, Bend, Gap, or Improvise the Filter Into Place
A filter that is difficult to insert is providing useful information: the product, rack, or installation may not match. The moment often happens with one hand holding the access panel and the other trying to bow the frame into place. That is the point to stop, not the point to push harder. Crushing the frame can damage the filter and make removal harder, while a loose smaller filter can create a low-resistance route around the media.
Bypass-air diagram:
Correct path
Return air → snug filter frame → air passes through filter media → blower
Gap path
Return air → open edge around frame → air follows easier bypass route → blower
Crushed-filter path
Bent frame → distorted media or broken seal → uneven path through and around filter
Improvised-adapter path
Tape, cardboard, stacked filters, or unapproved filler → uncertain seal and resistance → system behavior cannot be assumed
Do not trim a filter, stack multiple filters, build a cardboard spacer, tape over an access problem, or enlarge the rack as a do-it-yourself solution. Filter-rack changes, cabinet conversions, duct changes, and blower decisions require approved equipment instructions and qualified HVAC assessment.
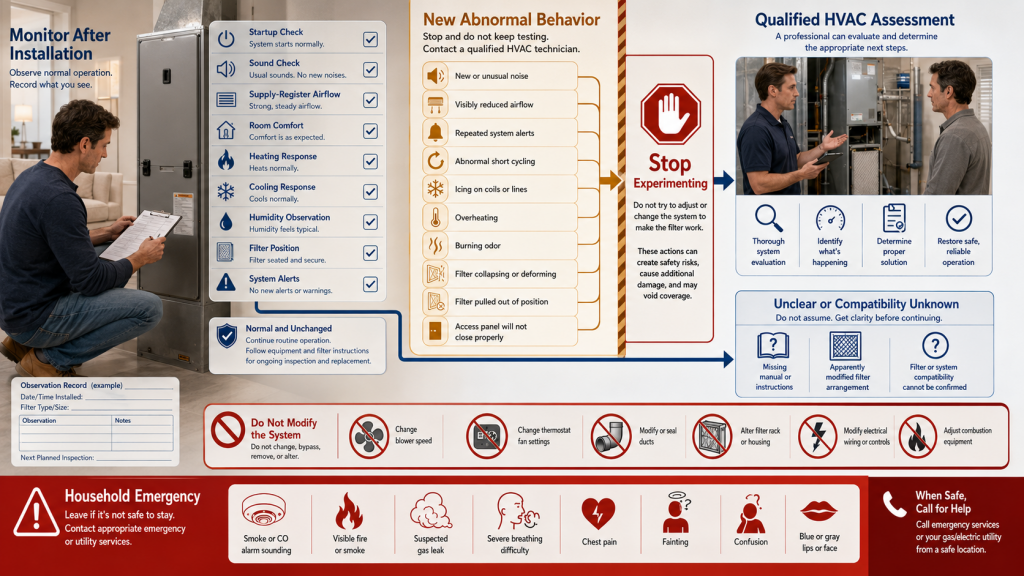
Monitor the System After Any Approved Filter Change
A compatible choice should not create new abnormal system behavior. After installation, notice how the equipment starts, sounds, delivers air, heats, cools, and reports alerts. Do not wait for a dramatic failure before responding to a meaningful change.
Technician-escalation box:
- Stop and seek qualified HVAC assessment for unusual new noise, visibly reduced airflow, repeated system alerts, or equipment that starts and stops abnormally.
- Seek assessment for icing, overheating, burning odors, a collapsing filter, a filter being pulled out of position, or a panel that no longer closes normally.
- Do not change blower settings, fan controls, ducts, combustion equipment, filter racks, or wiring to make a filter work.
- Use professional input when the manual is unclear, the filter arrangement appears modified, or compatibility cannot be confirmed from current documentation.
Comfort changes can also be clues. Rooms may heat or cool differently, airflow at registers may feel altered, or humidity behavior may change. Those observations do not diagnose the cause, but they are reasons to stop experimenting and have the system evaluated.
A sounding smoke or carbon monoxide alarm, visible fire or smoke, suspected gas leak, severe breathing difficulty, chest pain, fainting, confusion, blue or gray lips, or other emergency signs require leaving the area when safe and contacting emergency or utility services as appropriate.
Replace the Filter by Condition and Manufacturer Instructions
The interval printed on a package is not a universal household schedule. One home may load a filter quickly during renovation, while another reaches the same printed date with a very different operating history. System runtime, outdoor conditions, indoor sources, pets, filter area, installation quality, and the exact product all shape the result.
Build a repeatable inspection routine:
- Start with the equipment and filter manufacturer’s instructions.
- Record the installation date and exact filter specification.
- Inspect often enough to learn how the filter behaves in the home.
- Look for damage, collapse, moisture, abnormal loading, bypass gaps, or a loose frame.
- Respond to system alerts and operating changes rather than waiting for a calendar date.
- Replace the filter before it interferes with the approved operating condition.
Filter color alone does not prove remaining life. Media type, dust color, lighting, and loading pattern can make visual comparisons misleading. A simple date record and a quick condition note are more useful than trying to remember whether the last filter looked lighter or darker.
Filter inspection and replacement decisions cover the broader differences among equipment instructions, use conditions, visible damage, and replacement planning.
Choose the Exact Fit and the Highest MERV the System Can Support
Identify the exact equipment, filter location, approved arrangement, and current filter dimensions before comparing efficiency. Separate nominal size from actual length, width, and thickness, then confirm the airflow direction, rack condition, retention, and perimeter seal.
Consider MERV 13 when appropriate, or another documented option that the system can support. A smaller number installed squarely in the approved rack is a better decision than a more demanding filter that must be forced, stacked, trimmed, or supported by an improvised modification.
After installation, monitor filter condition and system behavior. When documentation is unclear or the equipment shows abnormal noise, airflow, temperature, icing, overheating, alerts, or comfort changes, stop experimenting and use qualified HVAC assessment.
FAQs
🏠 What MERV rating should I use at home?
Consider MERV 13 or the highest rating the exact system fan and filter slot can support when appropriate. Confirm the manual, approved filter type, actual dimensions, thickness, and system behavior rather than treating one number as universal.
📏 Why does a 20 × 20 × 1 filter not fit?
The printed size is often nominal. Actual length, width, and thickness can differ among filters with the same rounded label, so compare measured dimensions with the rack and equipment instructions.
🔢 Is MPR or FPR the same as MERV?
No. MPR and FPR are proprietary rating systems. Use the stated consensus MERV information, exact product documentation, and system compatibility instead of matching the largest number across different scales.
⬆️ Is a higher MERV filter always better?
No. Higher MERV indicates stronger tested particle performance, but the exact filter must fit and remain compatible with the blower, rack, and operating condition. The useful choice is the strongest category the system can support without improvised installation or abnormal behavior.
🧩 Can I bend a filter to make it fit?
No. Bending or crushing can damage the frame, distort the media, and create bypass gaps. Stop and verify the actual dimensions and approved filter specification.
➡️ Which way should the filter arrow point?
The arrow should point in the documented airflow direction, generally from the return side toward the blower or equipment. Confirm the rack and manual because filter locations differ among systems.
📅 How often should I replace an HVAC filter?
Follow the equipment and filter instructions, then adjust inspections to the home’s conditions, fan runtime, and observed loading. Do not rely on one package interval or filter color as universal proof.
⚠️ When should I call an HVAC technician?
Seek qualified assessment when compatibility is unclear or a filter change is followed by abnormal noise, reduced airflow, icing, overheating, system alerts, collapsing media, repeated shutdowns, or comfort changes. Do not modify the rack, blower, ducts, wiring, or controls to make a filter work.