Progressive muscle relaxation uses a deliberate tense-and-release sequence to help you notice the difference between effort and letting go. The tension should be gentle enough to create contrast, not a maximum clench. Skip or modify any area that is painful, injured, cramping, recently operated, numb, weak, or medically restricted. You can use a full body sequence when time and privacy allow, then build a shorter five-group version for regular practice.
The Exercise Needs Contrast, Not Maximum Effort
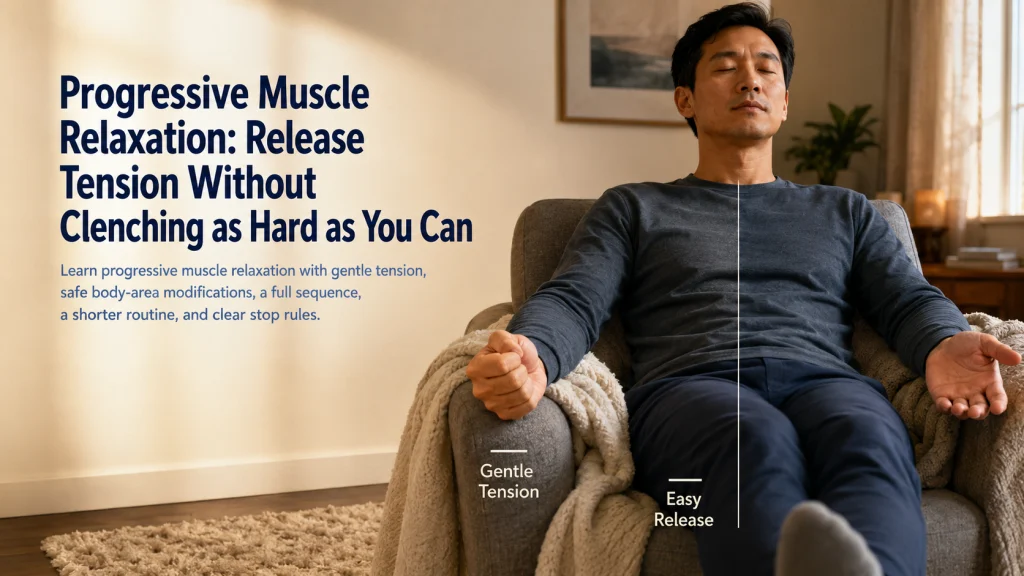
Place one hand beside the other. In the first hand, imagine squeezing with full force until the knuckles whiten and the wrist stiffens. In the second, tighten only enough to notice that the fingers, palm, and forearm are working. Both hands create tension, but only the lighter version leaves room to release without strain.
Progressive muscle relaxation works through that contrast. You briefly create a clear but low-effort contraction in one muscle group, release it, and notice the change. The goal is not to prove how hard you can clench or to force the body into a perfectly relaxed state.
A small, controlled difference between “working” and “not working” is enough.
Define Progressive Muscle Relaxation and Its Actual Task
Progressive muscle relaxation, often shortened to PMR, is a structured relaxation technique that moves through muscle groups in sequence. Each group is briefly activated at a modest level, released, and then observed before moving on.
The actual task is recognition. You learn what controlled muscle effort feels like, what release feels like, and where unnecessary tension tends to remain. The practice is not stretching, strength training, massage, or rehabilitation for a painful area.
PMR also differs from simply telling yourself to relax. The brief contraction gives the nervous system and attention a clearer before-and-after signal.
Key decision: Choose tension that is obvious but easy to stop. If the movement requires bracing, grimacing, breath holding, or pushing through symptoms, the intensity is too high.
For a broader comparison of body-first options, review breathing exercises for stress.
Screen for Pain, Injury, Cramping, and Movement Limits
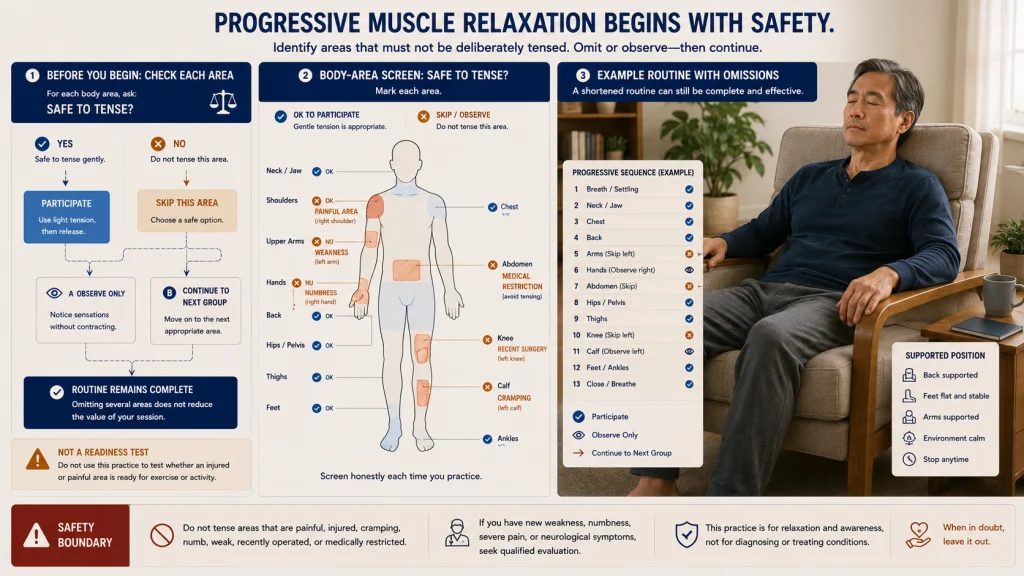
Before starting, identify any area that should not be deliberately tensed. This includes an injured joint or muscle, a body part with active pain, a recent surgical area, a muscle that is already cramping, or a region with a medical movement restriction.
Do not use the sequence to test whether a painful area is ready for exercise. Instead, omit that region or observe it without contracting. A shortened routine that excludes one or more groups is still a complete relaxation practice.
Do not tense an injured, painful, recently operated, cramping, numb, weak, or medically restricted area without qualified guidance. New weakness, numbness, severe pain, or neurological symptoms require evaluation.
Persistent joint or muscle pain, pregnancy, recent surgery, chronic conditions, disability-related limitations, or a long period of inactivity may require individualized guidance before beginning a tense-and-release routine.
Choose a Supported Position
Sit in a stable chair with the feet supported, or lie down where getting up will be easy. Let the head, back, and limbs rest so you do not have to hold yourself in position throughout the sequence.
Clear enough space to move the hands, bend the elbows, lift the shoulders slightly, and tense the legs without hitting furniture. A blanket or folded towel can improve comfort, but the practice does not require specialized equipment.
A seated position may fit shared rooms, work breaks, or people who prefer not to lie on the floor. Lying down may reduce the effort of holding the trunk upright, though it can make the practice less practical when the floor is hard, space is limited, or getting up is difficult.
Editorial observation: The most usable setup is often the one that can begin without rearranging an entire room. A stable chair, a few minutes of privacy, and an audio track that can be paused may support more regular practice than a longer floor routine that requires extra space and preparation.
Set a Gentle Tension Ceiling
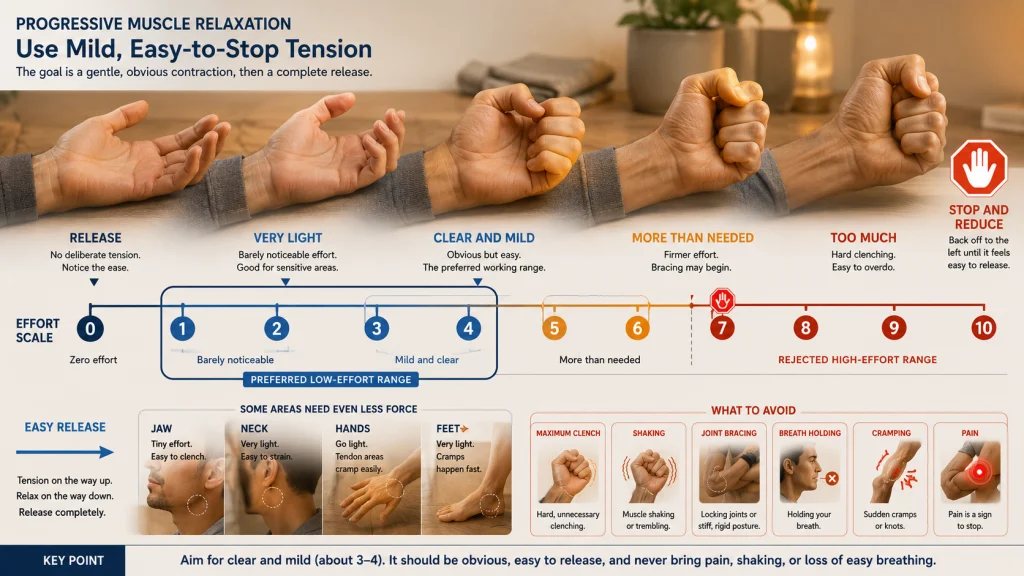
Use an intensity scale to keep the sequence from turning into a strength test.
| Level | What it feels like | Decision |
|---|---|---|
| 0 | No deliberate tension | Useful during the release phase |
| 1 to 2 | Barely noticeable effort | May be enough for sensitive areas |
| 3 to 4 | Clear, mild contraction without strain | Good working range for many areas |
| 5 to 6 | Firm effort that may invite bracing | Usually more than needed |
| 7 to 10 | Hard clench, shaking, pain, or loss of easy breathing | Stop and reduce the effort |
The numbers are not a medical measurement. They simply keep the contraction below a straining effort. Use less force in the jaw, neck, hands, feet, or any area that tends to cramp.
Move Through the Body With Optional Omissions
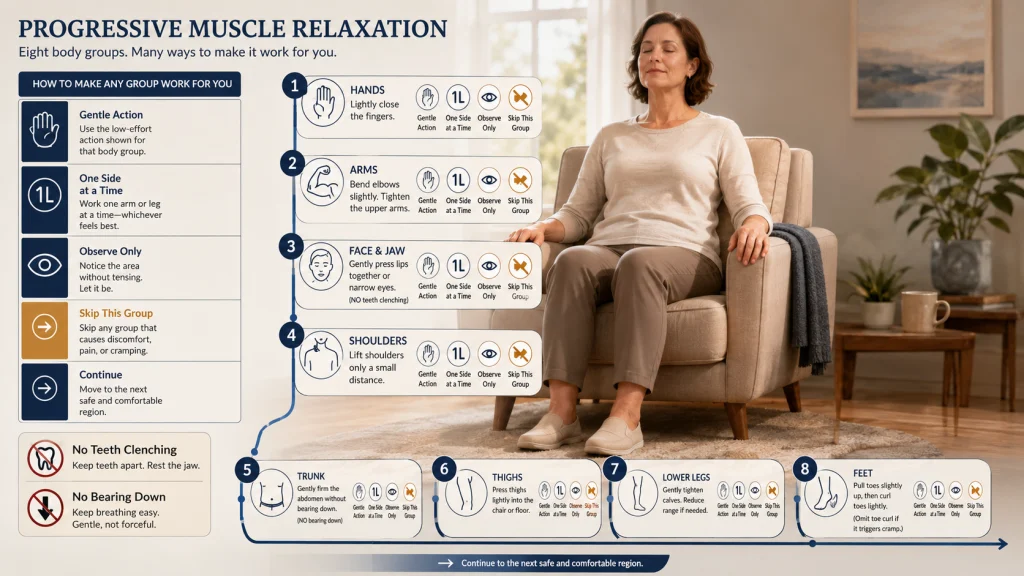
Use one direction from the hands toward the feet so the order is easy to remember. Activate one group, release it fully, notice the change, and then continue.
| Order | Body group | Gentle action | Modification or omission |
|---|---|---|---|
| 1 | Hands | Close the fingers into a light fist | Keep the fingers curved without squeezing if the hands cramp |
| 2 | Arms | Bend the elbows slightly and tighten the upper arms | Use one arm at a time or omit a painful side |
| 3 | Face and jaw | Press the lips gently or narrow the eyes slightly | Do not clench the teeth; observe without tensing if the jaw is painful |
| 4 | Shoulders | Lift the shoulders a small distance toward the ears | Keep the movement minimal or skip it with neck or shoulder symptoms |
| 5 | Trunk | Gently firm the abdomen without bearing down | Use observation only after surgery, during pregnancy, or with restrictions |
| 6 | Thighs | Press the legs lightly into the chair or floor | Use one side at a time or omit an injured leg |
| 7 | Lower legs | Pull the toes slightly upward | Reduce the range if the calves tend to cramp |
| 8 | Feet | Curl the toes lightly | Skip toe curling when it triggers cramping |
The sequence is a map, not a requirement to contract every area. Omit any body group that does not feel appropriate and continue with the next safe region.
Notice Release Without Forcing Relaxation
At the end of each brief contraction, stop the effort rather than pushing the muscle into a stretch. Let the hand open, the shoulders drop, or the leg rest in its supported position.
Notice simple differences: warmth, heaviness, reduced pressure, softer contact with the chair, or no obvious change at all. The practice does not fail when a body part still feels tense. Awareness is the task, while relaxation may be subtle or delayed.
Avoid repeatedly checking whether the body is relaxed enough. That can turn the release phase into another performance test. Notice what is present, allow ordinary breathing, and move on.
Coordinate Natural Breathing Without Breath Holds
Keep breathing throughout the contraction and release. You may inhale as the effort begins and exhale as it ends, but the sequence does not require a fixed count or a held breath.
When a muscle contraction causes breath holding, reduce the effort. The contraction should fit inside normal breathing rather than forcing the chest, throat, or abdomen to brace.
Readers who find breathing mechanics distracting can practice the muscle sequence first and allow the breath to move naturally. Those who want a separate breathing skill can use diaphragmatic breathing outside the PMR session.
Build a Five-Group Shortened Version
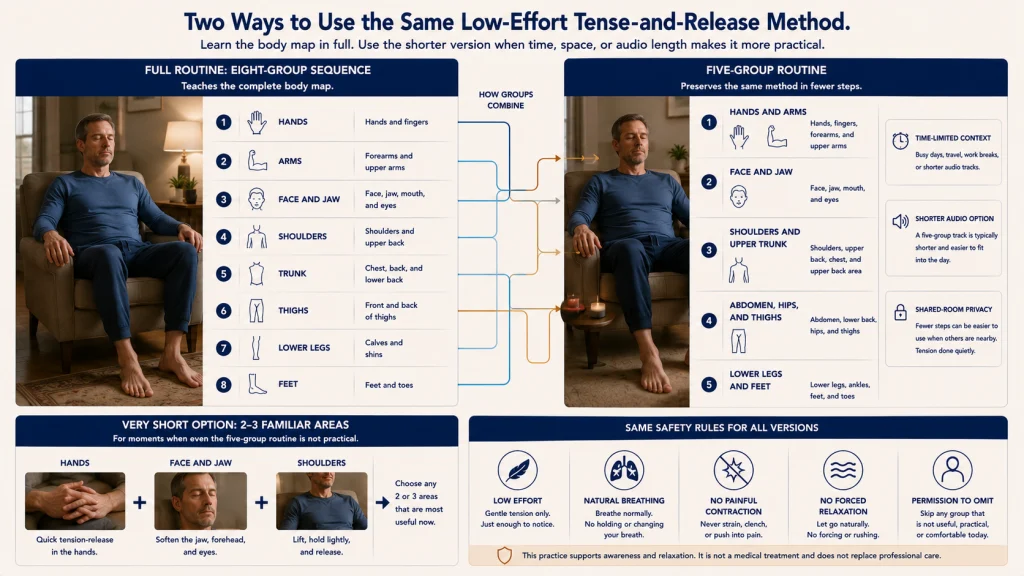
A full sequence can be useful for learning the body map. Once the pattern is familiar, combine neighboring regions into five larger groups for a shorter routine.
- Hands
- Arms
- Face and jaw
- Shoulders
- Trunk
- Thighs
- Lower legs
- Feet
- Hands and arms
- Face and jaw
- Shoulders and upper trunk
- Abdomen, hips, and thighs
- Lower legs and feet
Use the abbreviated version when time is limited or a long track reduces adherence. Keep the same rules: low effort, no painful contraction, no breath holding, and permission to omit a group.
A very short practice can focus on the two or three areas where ordinary tension is easiest to notice, such as hands, jaw, and shoulders. It does not need to become a complete body routine every time.
Use Audio Guidance Without Becoming Dependent on It
An audio guide can reduce the need to remember the order, but it should allow you to skip a region, shorten the sequence, or stop immediately. A fixed track that instructs maximum effort or requires every body part is not a good fit.
- Length: Choose a track that fits the time you can repeat.
- Pacing: Make sure the pauses are long enough to release without feeling rushed.
- Skip control: Use guidance that lets you omit painful or restricted areas.
- Privacy: Headphones may help in a shared room, but should not block important household sounds when awareness is needed.
- Screen use: A bright display is unnecessary once the audio begins.
- Subscription: The basic sequence should not depend on ongoing payment.
- Exit: Stop the track when symptoms or frustration appear.
After learning the order, try a session without audio. Quiet self-guidance can make the practice more portable and less dependent on a device.
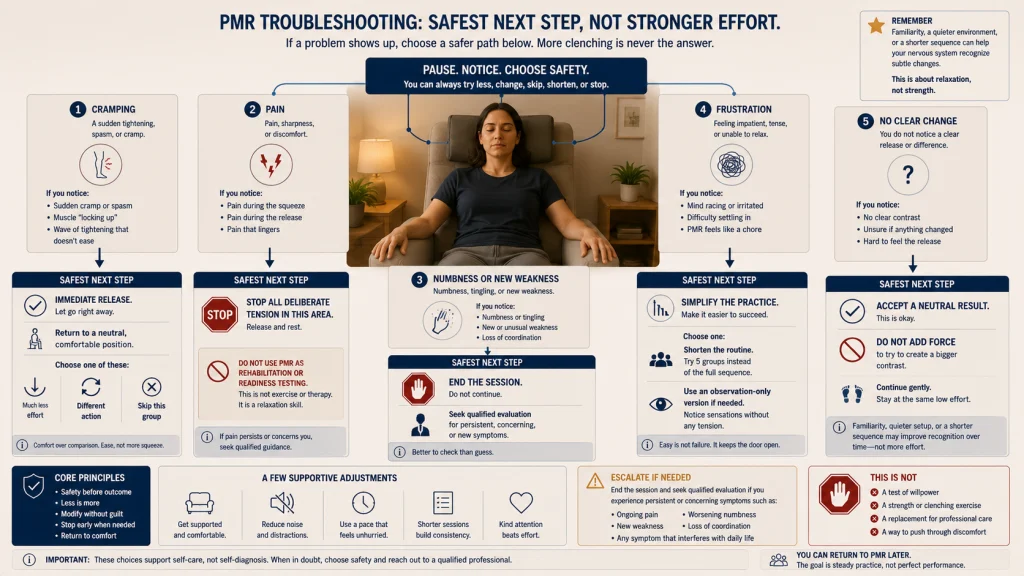
Troubleshoot Cramping, Pain, Numbness, and Frustration
| Problem | Immediate response | Next decision |
|---|---|---|
| Cramping | Release immediately and return the body part to a neutral position | Use much less effort, change the action, or omit that group |
| Pain | Stop tensing the area | Do not use PMR as rehabilitation or a test of the painful body part |
| Numbness or new weakness | End the practice | Seek qualified evaluation |
| Frustration | Reduce the number of groups and shorten the session | Use a five-group or observation-only version |
| No clear release sensation | Accept the neutral result and continue | Do not increase force to create a stronger contrast |
Difficulty noticing release is not a reason to use more force. The contrast can become clearer with familiarity, a quieter setup, or a shorter sequence.
Compare PMR With Diaphragmatic Breathing and Body Scan
| Method | Primary task | Best fit question |
|---|---|---|
| Progressive muscle relaxation | Gently tense and release muscle groups in sequence | Does deliberate contrast help you notice tension? |
| Diaphragmatic breathing | Reduce unnecessary upper-body breathing effort | Is breathing mechanics the main skill you want to practice? |
| Body scan | Observe sensations without deliberate contraction | Would observation fit better than tensing? |
Use body scan meditation when deliberate muscle contraction feels unsuitable or distracting. PMR is distinct because it intentionally creates mild tension before release.
Know When to Stop
End the session if a contraction causes pain, cramping that does not release, new numbness, weakness, severe dizziness, faintness, chest discomfort, or severe shortness of breath. Return to a supported position and do not restart while symptoms remain.
Urgent boundary: Chest pain, severe shortness of breath, fainting, stroke signs, immediate danger, or self-harm thoughts require urgent help. New weakness, numbness, severe pain, or neurological symptoms require evaluation.
New, severe, persistent, worsening, unexplained, or function-limiting symptoms need qualified guidance. This practice does not replace medical care, mental-health treatment, medication, rehabilitation, or emergency action.
Choose the Full or Abbreviated Sequence
Begin with a supported position and a clear upper limit for effort. Move through only the body groups that can be contracted without pain, cramping, or restriction, then notice the release without demanding a particular sensation.
Use the full sequence while learning the method, or choose the five-group version when time, space, privacy, or audio length creates friction. The best routine preserves easy breathing, controlled effort, and permission to skip.
For the wider set of practical stress tools, return to how to manage stress.
FAQs
✊ How hard should I tense during progressive muscle relaxation?
Use mild, clear tension that is easy to stop. Reduce the effort if you shake, brace, hold your breath, cramp, or feel pain.
🩹 Should I tense a painful or injured area?
No. Omit an injured, painful, recently operated, cramping, numb, weak, or medically restricted area unless qualified guidance specifically allows it.
🪑 Can I do PMR while sitting in a chair?
Yes. Use a stable chair with the feet and back supported, and leave enough space to move the limbs gently without hitting furniture.
🌬️ Should I hold my breath while tensing?
No. Keep breathing naturally. The contraction is too forceful if it makes you brace or hold the breath.
⏱️ Can I use a shorter version?
Yes. Combine the body into five groups or focus on two or three familiar tension areas. Keep the same safety and intensity rules.
🎧 Do I need a guided audio track?
No. Audio can help with order and pacing, but the method can be practiced through quiet self-guidance. Choose a track that can be paused, shortened, and adjusted.
🧠 Is PMR the same as a body scan?
No. PMR deliberately creates mild tension and then releases it. A body scan observes sensations without requiring contraction.
🚩 When should I stop the exercise?
Stop for pain, persistent cramping, new numbness, weakness, faintness, severe dizziness, chest discomfort, or severe shortness of breath. Concerning or persistent symptoms require appropriate evaluation.