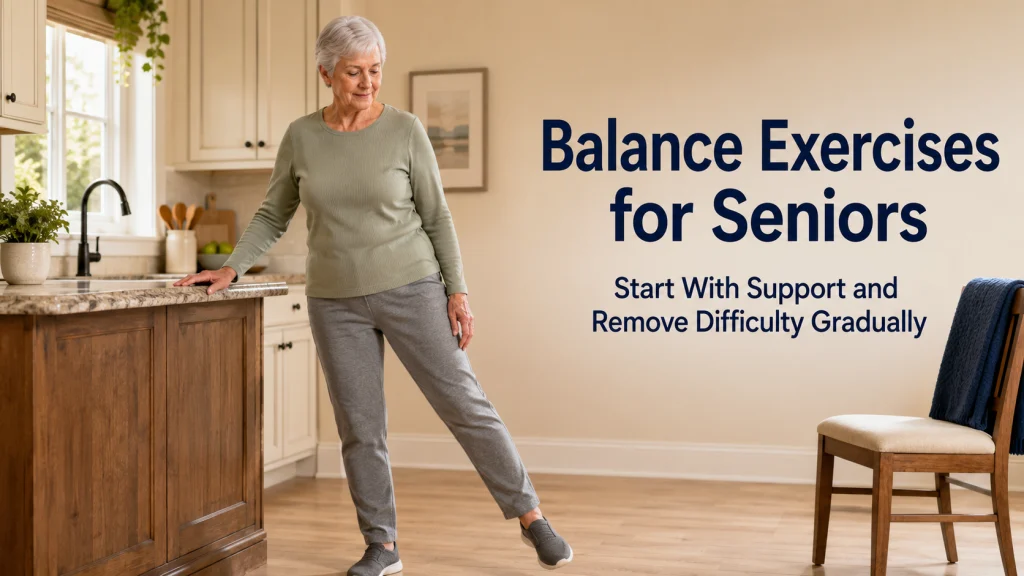
Balance exercises for seniors should begin with stable support and a practice area where a small mistake does not become a serious fall. Start with stance and controlled weight shifts, then add reaching, direction changes, and stepping only when the earlier version remains organized. Progress one variable at a time, such as support, vision, surface, or movement, so the result is easier to interpret. Stop self-directed practice after a fall or when dizziness, fainting, sudden weakness, chest pain, severe shortness of breath, or another new or unexplained change appears.
Compare the same exercise beside three different supports
Picture one simple standing weight shift performed in three places. In the first, the person stands beside a sturdy counter that does not move. In the second, the same movement happens beside a loose dining chair that can slide or tip. In the third, the person stands in open space with nothing within reach.
The movement name has not changed, but the risk has. The counter offers a reliable place to steady the body. The loose chair looks supportive without behaving like support. Open space removes the backup entirely.
Feeling less steady can make ordinary movement feel uncertain, and that concern deserves a setup that restores a sense of control rather than testing courage.
The exercise name matters less than the support and consequence of losing balance. A cautious home plan starts by controlling the environment, then chooses a movement that fits the available support.
Understand static, dynamic, and reactive balance in plain language
Balance is not one single skill. Different daily moments ask the body to stay steady, move while staying controlled, or respond when something unexpected changes.
- Static balance means staying organized in one position, such as standing at the sink or waiting in line.
- Dynamic balance means maintaining control while moving, such as turning, reaching, stepping, or changing direction.
- Reactive balance means responding to an unexpected disturbance, such as a surface shift or accidental bump.
General home practice can work with supported standing, weight shifts, reaches, turns, and planned steps. It should not try to create unpredictable disturbances or imitate a loss of balance. Reactive problems, repeated near falls, or difficulty recovering from unexpected movement may require qualified assessment rather than a harder home drill.
This article does not diagnose a balance disorder or explain dizziness. Use the broader mobility decision guide when you are unsure whether the main issue is balance, strength, chair access, walking, endurance, or fear-related avoidance.
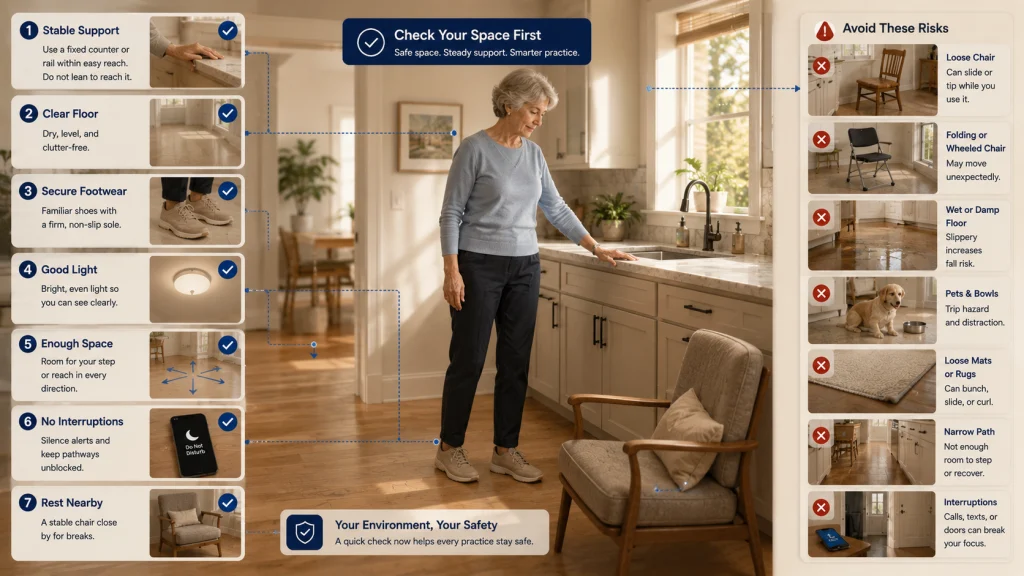
Run a location and support safety check
Choose the practice area before choosing the exercise. The safest-looking room is not always the most useful one. A clear wall may be too far from support, while a kitchen counter may be stable but surrounded by wet flooring, hot cookware, or narrow traffic paths.
| Safe-area check | What to confirm |
|---|---|
| Support | The counter, rail, or other surface is fixed, stable, and easy to reach without leaning. |
| Floor | The surface is dry, level, and free of loose rugs, cords, clutter, or rolling objects. |
| Footwear | The footwear and floor combination feels secure and familiar for standing practice. |
| Lighting | The area is bright enough to see the floor, support, and nearby obstacles clearly. |
| Space | There is enough room for the intended reach, turn, or step without contacting furniture. |
| Interruptions | Pets, children, doors, phones, and other people are unlikely to enter the practice path. |
| Exit | A stable chair or resting place is nearby if the person needs to stop. |
A chair should not be treated as support unless it is designed and positioned to stay still. Lightweight, folding, wheeled, or swivel furniture can move at the moment support is needed.
Editorial observation: Household friction often appears in the setup rather than the exercise. A pet bowl, loose mat, narrow path, or chair that slides can turn a manageable movement into an unnecessary problem.
Start with stance and controlled weight shifts
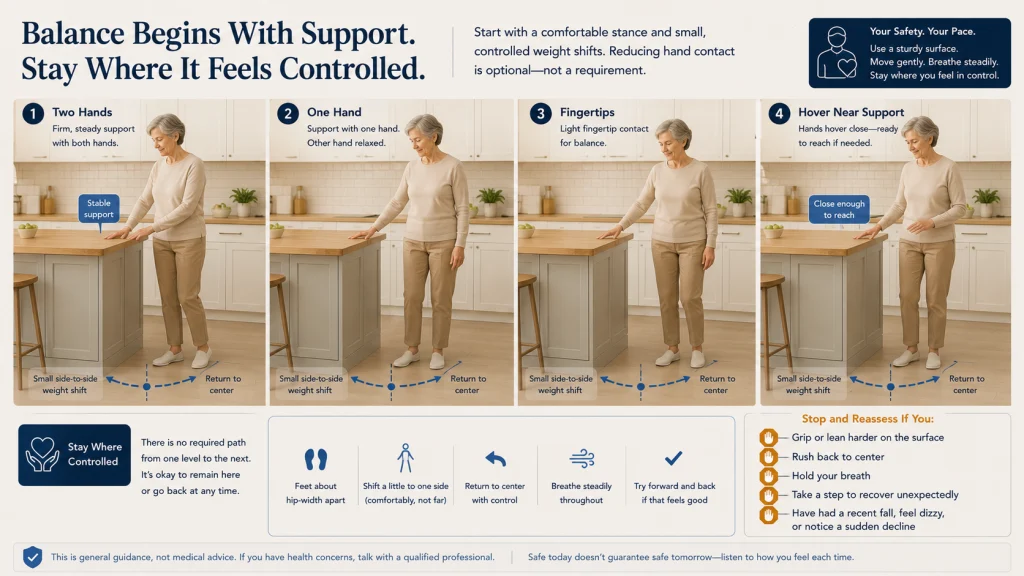
Begin in a comfortable standing position beside stable support. The feet should feel secure on the floor, and the person should be able to rest a hand on the support without reaching or twisting.
The first drill can be a small shift from one foot toward the other while both feet remain on the floor. The movement should be slow enough to notice where body weight moves and small enough that control remains clear. A second option is a gentle forward and backward shift without lifting the heels or toes far from the floor.
Do not chase a dramatic range. The useful version is the one that can be repeated without gripping the support harder, rushing back to center, holding the breath, or creating a near-loss of balance.
| Support level | Starting position | When it may be appropriate |
|---|---|---|
| Level 1: firm two-hand support | Both hands rest lightly on a stable counter or rail. | The person needs a clear and reliable starting boundary. |
| Level 2: firm one-hand support | One hand remains on the stable surface. | The two-hand version stays controlled without pulling on support. |
| Level 3: fingertip contact | Fingertips maintain light contact with the stable surface. | The person can remain organized with less hand pressure. |
| Level 4: hands hovering near support | Hands remain ready, with the stable surface immediately reachable. | Earlier levels are steady and there is no recent fall, unexplained dizziness, or sudden decline. |
This ladder is a way to describe support, not a path everyone must complete. Stable hand contact may remain the right version when it keeps the movement organized and the surrounding risk low.
Add reaches and direction changes within a safe base
Once a basic stance and small weight shift remain controlled, add movement without narrowing the base too quickly. A reach can begin toward a nearby target at waist or chest height while one hand remains close to support.
Direction changes can start as a small head and shoulder turn, then progress to a controlled whole-body turn with deliberate foot placement. Avoid twisting the upper body while the feet remain trapped in place. The movement should resemble the way a person turns toward a doorway, countertop, or nearby object.
Keep the target within a range that does not require leaning far beyond the feet. Reaching farther is not automatically better. A useful reach trains control while preserving a clear return path.
Use the functional movement guide when reaching and turning are part of a broader daily task such as carrying groceries, moving through a kitchen, or reaching household storage.
Add stepping patterns only after stable control
Stepping introduces a moment when one foot leaves the floor. That makes support, floor conditions, and step size more important than the exercise label.
Begin with a small planned step forward and return to the starting position while stable support remains available. Side steps can follow when the forward version stays organized. Direction changes and repeated step patterns come later, not because they are advanced by name, but because they add more transitions to control.
Stop the step if the person lands heavily, crosses the feet unintentionally, pulls on the support, cannot return to the starting position, or needs a quick second step to recover. Those signs mean the version has exceeded current control.
Chair access may be the better starting point when standing tolerance is limited. Use the chair-based exercise guide when a seated position provides a more appropriate way to begin moving.
Progress support, vision, surface, or movement one at a time
A balance drill can become harder in several ways. Reducing hand support, narrowing stance, increasing reach, changing direction, adding a step, altering the surface, or changing visual input all increase demand. To understand the result, change only one source of difficulty before repeating the drill.
The next adjustment may come from one of these areas:
- Support: move from two hands to one hand, or from hand contact to light fingertip contact.
- Movement: increase reach, add a controlled turn, or introduce one planned step.
- Stance: change foot position modestly without removing nearby support.
- Vision: change where the eyes look while keeping the environment visible and safe.
- Surface: use a different firm and predictable surface only when the original version is well controlled.
Closing the eyes or using unstable surfaces can sharply increase difficulty and is not a casual next step. Home practice should not imitate a fall challenge. If progress seems to require removing every safety margin, qualified guidance is more appropriate than improvisation.
Use a spotter without pulling or pushing
A spotter can improve the setup, but the role is not to move the person through the exercise. Pulling an arm, pushing the trunk, or trying to catch a full fall can create new risk for both people.
The spotter should help prepare a clear area, confirm that stable support is within reach, stand close enough to observe, and communicate before the movement begins. The person practicing should know where the spotter will stand and what signal means the drill should stop.
A spotter should not create false confidence for a movement that is otherwise too difficult. If the exercise requires constant physical correction, repeated catching, or strong assistance, it is no longer an appropriate self-directed home drill.
Spotter boundary: Observation and setup support are different from rehabilitation, transfer assistance, or fall recovery. Those needs may require individualized professional instruction.
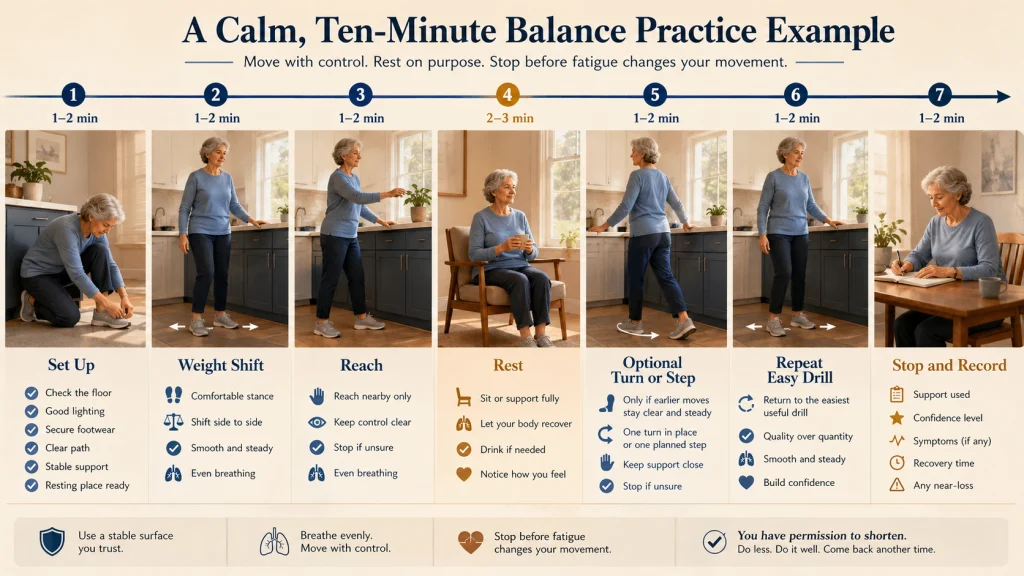
Create a ten-minute practice sequence with rest
This sample sequence shows how to organize a short session. It is an example, not a universal prescription. Shorten it, add rest, or stop when control changes.
| Time | Practice element | What to watch |
|---|---|---|
| Minute 1 | Set up the area and confirm stable support. | Floor, lighting, footwear, clear path, and resting place. |
| Minutes 2 to 3 | Comfortable stance with small side-to-side weight shifts. | Even breathing, light support, and controlled return to center. |
| Minutes 4 to 5 | Small forward and backward shifts or nearby reaches. | No rushing, leaning, or stronger gripping of support. |
| Minute 6 | Rest while standing securely or sitting in the nearby chair. | Any dizziness, unusual breathlessness, pain, or loss of confidence. |
| Minutes 7 to 8 | Controlled turns or one-step patterns if earlier movements remain stable. | Deliberate foot placement and a clear return position. |
| Minute 9 | Repeat the easiest useful drill. | Whether the movement remains as organized as it was at the start. |
| Minute 10 | Stop, sit if needed, and record the result. | Near-losses, support used, confidence, symptoms, and recovery. |
A shorter sequence is appropriate when attention, energy, standing tolerance, or confidence is limited. The session should end before fatigue changes the movement pattern or makes later daily tasks harder.
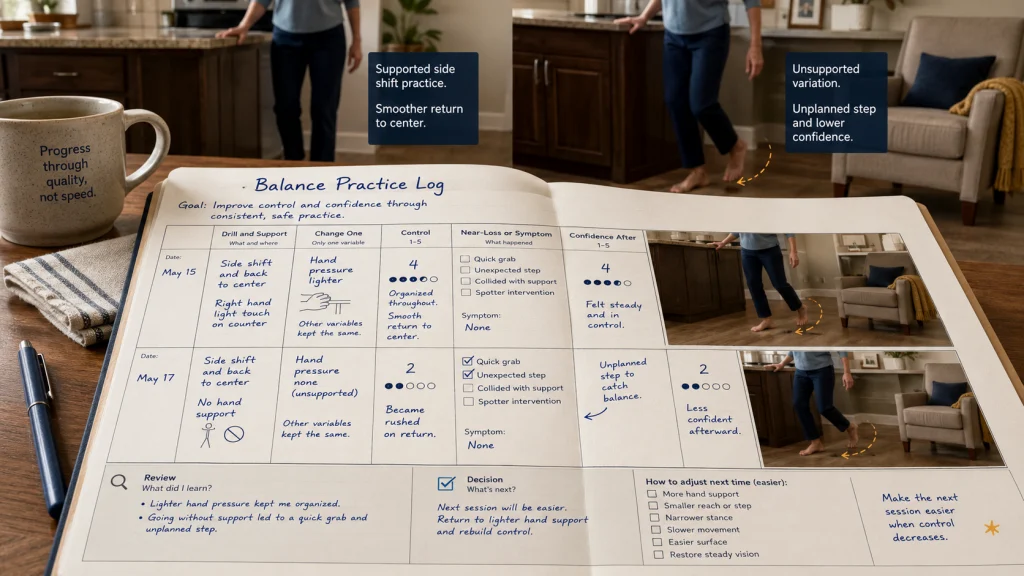
Track near-losses of balance and confidence honestly
Progress is not only the ability to remove support. It may appear as less gripping, smoother return to center, more deliberate foot placement, or greater confidence in a version that still uses the counter.
Record near-losses of balance instead of hiding them. A quick grab, unexpected step, collision with support, or need for the spotter to intervene is useful information. It means the current version or environment needs to change.
| Date | Drill and support | Progression variable | Control | Near-loss or symptom | Confidence afterward |
|---|---|---|---|---|---|
| Date | Example: side shift with one hand on counter | None, support, reach, stance, vision, surface, or movement | Organized, rushed, or inconsistent | Describe what happened | Higher, unchanged, or lower |
| Date | Drill and support used | One variable only | Observation | Observation | Observation |
| Date | Drill and support used | One variable only | Observation | Observation | Observation |
Confidence should not be forced upward by making the task harder. A supported drill that feels controlled can be more useful than an unsupported drill that creates fear or repeated recovery steps.
Escalate after falls, sudden dizziness, fainting, or new weakness
Safety warning: End the session and seek qualified professional evaluation after a fall or when there is fainting, chest pain, severe breathlessness, sudden weakness, major loss of function, or dizziness or pain that is new, severe, persistent, worsening, or unexplained. Emergency symptoms require immediate appropriate help.
Do not use home balance practice to diagnose vertigo, frailty, a balance disorder, cognitive impairment, disability, or the cause of a sudden change. Do not treat a recent fall as evidence that the person simply needs a harder balance routine.
Qualified assessment is also appropriate when the person cannot find a stable starting position, repeatedly loses balance despite support, requires another person to prevent a fall, or becomes increasingly afraid to move through ordinary spaces.
Use the sit-to-stand guide when chair rise is the specific limiting task rather than general steadiness. The broader healthy aging guide can help place balance practice inside a wider daily-life plan.
Choose one supported drill, one progression variable, and one stop rule
Finish the plan in three lines:
- Supported drill: Name the stance, weight shift, reach, turn, or step and the stable support that will remain available.
- Progression variable: Choose only one change, such as lighter hand contact, a slightly larger reach, or one additional planned step.
- Stop rule: State which loss of control, symptom, fall, or confidence change means the practice ends and qualified assessment is needed.
A complete example might read: “I will practice small side-to-side shifts with one hand on the kitchen counter. I will change only hand pressure after the movement remains controlled. I will stop after any near fall, unexpected step, dizziness, pain, sudden weakness, unusual breathlessness, or need for another person to catch me.”
The useful goal is not to eliminate every small sway. It is a safer, observable practice setup that makes progression deliberate and keeps warning signs from being ignored.
FAQs
⚖️ What should I use for support during balance practice?
Use a fixed, stable surface that is easy to reach without leaning, such as an appropriate counter or rail. Do not rely on loose, folding, wheeled, or swivel furniture that may move when support is needed.
🪑 Is a dining chair safe to hold?
Not automatically. A lightweight chair can slide or tip, especially when pulled from the side. Treat it as support only when its design and position make it reliably stable.
👣 Which balance movement should come first?
A comfortable stance and small controlled weight shifts are cautious starting options when the environment is stable and no warning symptoms are present. Reaching, turning, and stepping can follow only when the earlier version remains organized.
📈 How should I progress a balance exercise?
Change one variable at a time, such as support, reach, stance, vision, surface, or movement. Keep nearby support available and return to the earlier version when control decreases.
🙈 Should I practice with my eyes closed?
Closing the eyes can sharply increase difficulty and is not a casual progression. Do not remove visual information simply to make a drill feel advanced, especially without individualized guidance.
🤝 What should a spotter do?
A spotter can clear the area, confirm support, observe closely, and help stop the drill. The spotter should not pull, push, or repeatedly catch the person through a movement that is too difficult.
📝 What counts as a near-loss of balance?
A quick grab, unplanned recovery step, collision with support, or need for another person to intervene should be recorded. These events mean the setup or movement needs to become easier.
🚩 When should home balance practice stop?
End home practice after any fall, sudden loss of strength or function, fainting, chest discomfort, severe breathing difficulty, or dizziness or pain that does not have a clear ordinary explanation. Seek qualified evaluation, and get immediate help when symptoms may be an emergency.